UFC 168: Weidman vs. Silva 2 ·
Dec 28, 2013 ·
Heavyweight ·
Completed
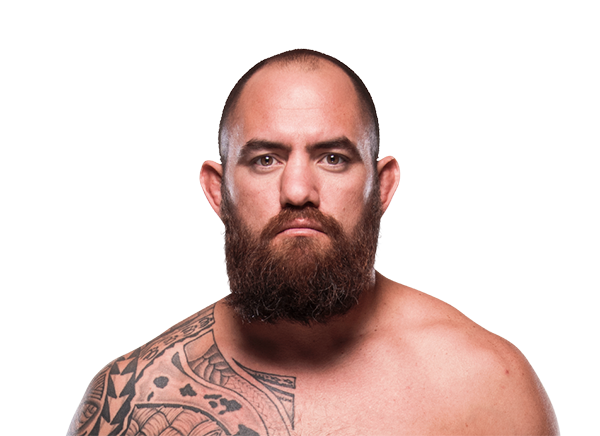
Career Averages - Travis Browne
2.93
SLpM
41.0%
Str. Acc.
4.31
SApM
42.0%
Str. Def.
1.21
TD Avg
68.0%
TD Acc.
75.0%
TD Def.
0.2
Sub. Avg
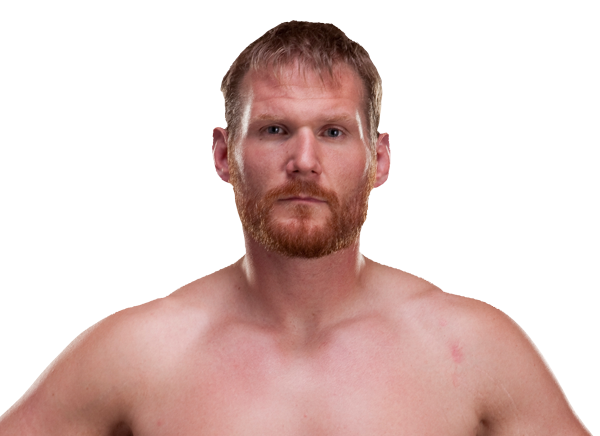
Career Averages - Josh Barnett
3.2
SLpM
50.0%
Str. Acc.
2.11
SApM
57.0%
Str. Def.
1.26
TD Avg
55.0%
TD Acc.
55.0%
TD Def.
1.4
Sub. Avg
Travis Browne - Fight History
LOSS
vs
Aleksei Oleinik
Submission (rear-naked choke)
R2
3:44
·
UFC 213: Romero vs. Whittaker ·
Jul 08, 2017
Totals
| Fighter | KD | Sig. Str. | Sig. Str. % | Total Str. | TD | TD % | Sub. Att | Rev. | Ctrl |
|---|---|---|---|---|---|---|---|---|---|
| Aleksei Oleinik | 1 | 35 of 71 | 49% | 37 of 74 | 1 of 1 | 100% | 0 | 0 | 1:23 |
| Travis Browne | 1 | 53 of 85 | 62% | 132 of 172 | 3 of 4 | 75% | 2 | 0 | 3:32 |
Per Round
| Rd | Fighter | KD | Sig. Str. | Sig. Str. % | Total Str. | TD | TD % | Sub. Att | Rev. | Ctrl |
|---|---|---|---|---|---|---|---|---|---|---|
| 1 | Aleksei Oleinik | 1 | 24 of 51 | 47% | 24 of 51 | 0 of 0 | --- | 0 | 0 | 0:10 |
| Travis Browne | 1 | 29 of 52 | 55% | 50 of 75 | 2 of 2 | 100% | 1 | 0 | 2:17 | |
| 2 | Aleksei Oleinik | 0 | 11 of 20 | 55% | 13 of 23 | 1 of 1 | 100% | 0 | 0 | 1:13 |
| Travis Browne | 0 | 24 of 33 | 72% | 82 of 97 | 1 of 2 | 50% | 1 | 0 | 1:15 |
Significant Strikes
| Fighter | Sig. Str. | Sig. Str. % | Head | Body | Leg | Distance | Clinch | Ground |
|---|---|---|---|---|---|---|---|---|
| Aleksei Oleinik | 35 of 71 | 49% | 17 of 48 | 16 of 21 | 2 of 2 | 25 of 59 | 10 of 11 | 0 of 1 |
| Travis Browne | 53 of 85 | 62% | 35 of 67 | 18 of 18 | 0 of 0 | 23 of 51 | 16 of 18 | 14 of 16 |
Significant Strikes Per Round
| Rd | Fighter | Sig. Str. | Sig. Str. % | Head | Body | Leg | Distance | Clinch | Ground |
|---|---|---|---|---|---|---|---|---|---|
| 1 | Aleksei Oleinik | 24 of 51 | 47% | 11 of 34 | 11 of 15 | 2 of 2 | 20 of 46 | 4 of 4 | 0 of 1 |
| Travis Browne | 29 of 52 | 55% | 20 of 43 | 9 of 9 | 0 of 0 | 15 of 35 | 6 of 8 | 8 of 9 | |
| 2 | Aleksei Oleinik | 11 of 20 | 55% | 6 of 14 | 5 of 6 | 0 of 0 | 5 of 13 | 6 of 7 | 0 of 0 |
| Travis Browne | 24 of 33 | 72% | 15 of 24 | 9 of 9 | 0 of 0 | 8 of 16 | 10 of 10 | 6 of 7 |
LOSS
vs
Derrick Lewis
KO (punches)
R2
3:12
·
UFC Fight Night: Lewis vs. Browne ·
Feb 19, 2017
Totals
| Fighter | KD | Sig. Str. | Sig. Str. % | Total Str. | TD | TD % | Sub. Att | Rev. | Ctrl |
|---|---|---|---|---|---|---|---|---|---|
| Derrick Lewis | 1 | 39 of 71 | 54% | 39 of 71 | 0 of 0 | --- | 0 | 0 | 1:40 |
| Travis Browne | 0 | 21 of 47 | 44% | 23 of 49 | 0 of 1 | 0% | 0 | 0 | 0:04 |
Per Round
| Rd | Fighter | KD | Sig. Str. | Sig. Str. % | Total Str. | TD | TD % | Sub. Att | Rev. | Ctrl |
|---|---|---|---|---|---|---|---|---|---|---|
| 1 | Derrick Lewis | 0 | 4 of 18 | 22% | 4 of 18 | 0 of 0 | --- | 0 | 0 | 0:11 |
| Travis Browne | 0 | 18 of 35 | 51% | 20 of 37 | 0 of 0 | --- | 0 | 0 | 0:04 | |
| 2 | Derrick Lewis | 1 | 35 of 53 | 66% | 35 of 53 | 0 of 0 | --- | 0 | 0 | 1:29 |
| Travis Browne | 0 | 3 of 12 | 25% | 3 of 12 | 0 of 1 | 0% | 0 | 0 | 0:00 |
Significant Strikes
| Fighter | Sig. Str. | Sig. Str. % | Head | Body | Leg | Distance | Clinch | Ground |
|---|---|---|---|---|---|---|---|---|
| Derrick Lewis | 39 of 71 | 54% | 37 of 67 | 0 of 2 | 2 of 2 | 21 of 50 | 1 of 1 | 17 of 20 |
| Travis Browne | 21 of 47 | 44% | 0 of 14 | 12 of 23 | 9 of 10 | 21 of 45 | 0 of 1 | 0 of 1 |
Significant Strikes Per Round
| Rd | Fighter | Sig. Str. | Sig. Str. % | Head | Body | Leg | Distance | Clinch | Ground |
|---|---|---|---|---|---|---|---|---|---|
| 1 | Derrick Lewis | 4 of 18 | 22% | 2 of 14 | 0 of 2 | 2 of 2 | 3 of 17 | 1 of 1 | 0 of 0 |
| Travis Browne | 18 of 35 | 51% | 0 of 8 | 10 of 19 | 8 of 8 | 18 of 34 | 0 of 0 | 0 of 1 | |
| 2 | Derrick Lewis | 35 of 53 | 66% | 35 of 53 | 0 of 0 | 0 of 0 | 18 of 33 | 0 of 0 | 17 of 20 |
| Travis Browne | 3 of 12 | 25% | 0 of 6 | 2 of 4 | 1 of 2 | 3 of 11 | 0 of 1 | 0 of 0 |
Play-by-Play
View on SherdogDerrick Lewis vs. Travis Browne
Round 1
Veteran referee Mario Yamasaki is the third man in the cage for tonight's heavyweight main event. Lewis misses with his first reaching right hand, and Browne counters with a short left hand on the ear. Browne circles to the outside, leaving Lewis in the center; Browne lands a leg kick, while Lewis slaps the Hawaiian's chest with a right kick. Browne lands a kick to the liver which prompts Lewis to cover his midsection with both hands. Lewis stays this way for roughly 20 seconds, but Browne is clearly hesitant to rush in and try for the finish. Instead, "Hapa" throws more low and body kicks, while Lewis slowly recovers from the body shot. A short right hand from Lewis sends Browne to the mat, but he's back on his feet before Lewis can tack on any ground-and-pound. Browne catches Lewis coming at him and lands a sharp knee to the gut, and Lewis turns his back, clutching his stomach again. Browne tries to chase him down, but Lewis spins around and clinches on the wall for a few seconds to recover. More body kicks connect for Browne in the final minute, but Lewis is protecting his right side now.
Sherdog Scores
Tristen Critchfield scores the round 10-9 Browne
Chris Nelson scores the round 10-9 Browne
Mike Sloan scores the round 10-9 Browne
Round 2
Browne goes straight back to the midsection of Lewis as they plod around the edge of the cage in the opening minute of round two. "Hapa" is controlling the center, using slow, measured movements and firing mostly kicks. Lewis isn't doing much in the first minute, but he comes alive after catching Browne with a right hand to the jaw. Browne covers up, his back against the wall, as Lewis tees off with both hands. An uppercut gets through cleanly for Lewis, but Browne looks up to tell referee Yamasaki that he's not hurt. Browne withstands the assault and tries a throw with double underhooks; Lewis blocks the throw and comes down to Browne's half guard. Browne gets back to his feet, but only for a split second, as Lewis trips him back to the mat. Halfway through the round, Lewis goes knee-on-belly to drop right hands, but Browne rolls inside and escapes to his feet. Both men wind up with big right hands, and it's Lewis which bounces off Browne's forehead and sends him to the ground. Lewis pounces and smashes Browne unconscious with several follow-up punches, and referee Yamasaki dives in for the stoppage.
The Official Result
Derrick Lewis def. Travis Browne via KO (Punches) R2 3:12
LOSS
vs
Fabrício Werdum
Decision (unanimous) (29–28, 29–27, 30–27)
R3
5:00
·
UFC 203: Miocic vs. Overeem ·
Sep 10, 2016
Totals
| Fighter | KD | Sig. Str. | Sig. Str. % | Total Str. | TD | TD % | Sub. Att | Rev. | Ctrl |
|---|---|---|---|---|---|---|---|---|---|
| Fabrício Werdum | 1 | 84 of 142 | 59% | 107 of 166 | 0 of 3 | 0% | 1 | 0 | 1:30 |
| Travis Browne | 0 | 37 of 143 | 25% | 38 of 144 | 0 of 0 | --- | 0 | 0 | 0:14 |
Per Round
| Rd | Fighter | KD | Sig. Str. | Sig. Str. % | Total Str. | TD | TD % | Sub. Att | Rev. | Ctrl |
|---|---|---|---|---|---|---|---|---|---|---|
| 1 | Fabrício Werdum | 1 | 37 of 59 | 62% | 60 of 83 | 0 of 1 | 0% | 1 | 0 | 1:30 |
| Travis Browne | 0 | 12 of 30 | 40% | 12 of 30 | 0 of 0 | --- | 0 | 0 | 0:03 | |
| 2 | Fabrício Werdum | 0 | 19 of 39 | 48% | 19 of 39 | 0 of 1 | 0% | 0 | 0 | 0:00 |
| Travis Browne | 0 | 11 of 42 | 26% | 12 of 43 | 0 of 0 | --- | 0 | 0 | 0:10 | |
| 3 | Fabrício Werdum | 0 | 28 of 44 | 63% | 28 of 44 | 0 of 1 | 0% | 0 | 0 | 0:00 |
| Travis Browne | 0 | 14 of 71 | 19% | 14 of 71 | 0 of 0 | --- | 0 | 0 | 0:01 |
Significant Strikes
| Fighter | Sig. Str. | Sig. Str. % | Head | Body | Leg | Distance | Clinch | Ground |
|---|---|---|---|---|---|---|---|---|
| Fabrício Werdum | 84 of 142 | 59% | 41 of 91 | 24 of 32 | 19 of 19 | 66 of 123 | 10 of 10 | 8 of 9 |
| Travis Browne | 37 of 143 | 25% | 27 of 123 | 4 of 11 | 6 of 9 | 35 of 140 | 2 of 2 | 0 of 1 |
Significant Strikes Per Round
| Rd | Fighter | Sig. Str. | Sig. Str. % | Head | Body | Leg | Distance | Clinch | Ground |
|---|---|---|---|---|---|---|---|---|---|
| 1 | Fabrício Werdum | 37 of 59 | 62% | 22 of 39 | 8 of 13 | 7 of 7 | 21 of 42 | 8 of 8 | 8 of 9 |
| Travis Browne | 12 of 30 | 40% | 9 of 27 | 2 of 2 | 1 of 1 | 10 of 28 | 2 of 2 | 0 of 0 | |
| 2 | Fabrício Werdum | 19 of 39 | 48% | 7 of 25 | 8 of 10 | 4 of 4 | 19 of 39 | 0 of 0 | 0 of 0 |
| Travis Browne | 11 of 42 | 26% | 6 of 34 | 1 of 3 | 4 of 5 | 11 of 41 | 0 of 0 | 0 of 1 | |
| 3 | Fabrício Werdum | 28 of 44 | 63% | 12 of 27 | 8 of 9 | 8 of 8 | 26 of 42 | 2 of 2 | 0 of 0 |
| Travis Browne | 14 of 71 | 19% | 12 of 62 | 1 of 6 | 1 of 3 | 14 of 71 | 0 of 0 | 0 of 0 |
LOSS
vs
Cain Velasquez
TKO (punches)
R1
4:57
·
UFC 200: Tate vs. Nunes ·
Jul 09, 2016
Totals
| Fighter | KD | Sig. Str. | Sig. Str. % | Total Str. | TD | TD % | Sub. Att | Rev. | Ctrl |
|---|---|---|---|---|---|---|---|---|---|
| Cain Velasquez | 1 | 50 of 79 | 63% | 90 of 124 | 1 of 3 | 33% | 0 | 0 | 2:36 |
| Travis Browne | 0 | 6 of 27 | 22% | 6 of 27 | 0 of 0 | --- | 0 | 0 | 0:00 |
Per Round
| Rd | Fighter | KD | Sig. Str. | Sig. Str. % | Total Str. | TD | TD % | Sub. Att | Rev. | Ctrl |
|---|---|---|---|---|---|---|---|---|---|---|
| 1 | Cain Velasquez | 1 | 50 of 79 | 63% | 90 of 124 | 1 of 3 | 33% | 0 | 0 | 2:36 |
| Travis Browne | 0 | 6 of 27 | 22% | 6 of 27 | 0 of 0 | --- | 0 | 0 | 0:00 |
Significant Strikes
| Fighter | Sig. Str. | Sig. Str. % | Head | Body | Leg | Distance | Clinch | Ground |
|---|---|---|---|---|---|---|---|---|
| Cain Velasquez | 50 of 79 | 63% | 35 of 63 | 5 of 6 | 10 of 10 | 28 of 49 | 5 of 8 | 17 of 22 |
| Travis Browne | 6 of 27 | 22% | 5 of 26 | 1 of 1 | 0 of 0 | 6 of 27 | 0 of 0 | 0 of 0 |
Significant Strikes Per Round
| Rd | Fighter | Sig. Str. | Sig. Str. % | Head | Body | Leg | Distance | Clinch | Ground |
|---|---|---|---|---|---|---|---|---|---|
| 1 | Cain Velasquez | 50 of 79 | 63% | 35 of 63 | 5 of 6 | 10 of 10 | 28 of 49 | 5 of 8 | 17 of 22 |
| Travis Browne | 6 of 27 | 22% | 5 of 26 | 1 of 1 | 0 of 0 | 6 of 27 | 0 of 0 | 0 of 0 |
WIN
vs
Matt Mitrione
TKO (punches)
R3
4:09
·
UFC Fight Night: Dillashaw vs. Cruz ·
Jan 17, 2016
Totals
| Fighter | KD | Sig. Str. | Sig. Str. % | Total Str. | TD | TD % | Sub. Att | Rev. | Ctrl |
|---|---|---|---|---|---|---|---|---|---|
| Travis Browne | 0 | 51 of 114 | 44% | 61 of 124 | 2 of 3 | 66% | 0 | 0 | 2:47 |
| Matt Mitrione | 1 | 27 of 61 | 44% | 28 of 62 | 0 of 1 | 0% | 0 | 0 | 0:00 |
Per Round
| Rd | Fighter | KD | Sig. Str. | Sig. Str. % | Total Str. | TD | TD % | Sub. Att | Rev. | Ctrl |
|---|---|---|---|---|---|---|---|---|---|---|
| 1 | Travis Browne | 0 | 8 of 24 | 33% | 8 of 24 | 0 of 0 | --- | 0 | 0 | 0:00 |
| Matt Mitrione | 1 | 8 of 25 | 32% | 9 of 26 | 0 of 0 | --- | 0 | 0 | 0:00 | |
| 2 | Travis Browne | 0 | 13 of 34 | 38% | 14 of 35 | 1 of 1 | 100% | 0 | 0 | 0:56 |
| Matt Mitrione | 0 | 14 of 30 | 46% | 14 of 30 | 0 of 1 | 0% | 0 | 0 | 0:00 | |
| 3 | Travis Browne | 0 | 30 of 56 | 53% | 39 of 65 | 1 of 2 | 50% | 0 | 0 | 1:51 |
| Matt Mitrione | 0 | 5 of 6 | 83% | 5 of 6 | 0 of 0 | --- | 0 | 0 | 0:00 |
Significant Strikes
| Fighter | Sig. Str. | Sig. Str. % | Head | Body | Leg | Distance | Clinch | Ground |
|---|---|---|---|---|---|---|---|---|
| Travis Browne | 51 of 114 | 44% | 31 of 77 | 18 of 33 | 2 of 4 | 23 of 72 | 3 of 3 | 25 of 39 |
| Matt Mitrione | 27 of 61 | 44% | 14 of 48 | 3 of 3 | 10 of 10 | 25 of 56 | 2 of 5 | 0 of 0 |
Significant Strikes Per Round
| Rd | Fighter | Sig. Str. | Sig. Str. % | Head | Body | Leg | Distance | Clinch | Ground |
|---|---|---|---|---|---|---|---|---|---|
| 1 | Travis Browne | 8 of 24 | 33% | 1 of 9 | 6 of 13 | 1 of 2 | 7 of 23 | 1 of 1 | 0 of 0 |
| Matt Mitrione | 8 of 25 | 32% | 4 of 21 | 1 of 1 | 3 of 3 | 7 of 21 | 1 of 4 | 0 of 0 | |
| 2 | Travis Browne | 13 of 34 | 38% | 3 of 18 | 9 of 15 | 1 of 1 | 11 of 32 | 2 of 2 | 0 of 0 |
| Matt Mitrione | 14 of 30 | 46% | 8 of 24 | 1 of 1 | 5 of 5 | 14 of 30 | 0 of 0 | 0 of 0 | |
| 3 | Travis Browne | 30 of 56 | 53% | 27 of 50 | 3 of 5 | 0 of 1 | 5 of 17 | 0 of 0 | 25 of 39 |
| Matt Mitrione | 5 of 6 | 83% | 2 of 3 | 1 of 1 | 2 of 2 | 4 of 5 | 1 of 1 | 0 of 0 |
LOSS
vs
Andrei Arlovski
TKO (punches)
R1
4:41
·
UFC 187: Johnson vs. Cormier ·
May 23, 2015
Totals
| Fighter | KD | Sig. Str. | Sig. Str. % | Total Str. | TD | TD % | Sub. Att | Rev. | Ctrl |
|---|---|---|---|---|---|---|---|---|---|
| Andrei Arlovski | 1 | 15 of 38 | 39% | 15 of 38 | 0 of 0 | --- | 0 | 0 | 0:06 |
| Travis Browne | 1 | 51 of 85 | 60% | 51 of 85 | 0 of 0 | --- | 0 | 0 | 0:05 |
Per Round
| Rd | Fighter | KD | Sig. Str. | Sig. Str. % | Total Str. | TD | TD % | Sub. Att | Rev. | Ctrl |
|---|---|---|---|---|---|---|---|---|---|---|
| 1 | Andrei Arlovski | 1 | 15 of 38 | 39% | 15 of 38 | 0 of 0 | --- | 0 | 0 | 0:06 |
| Travis Browne | 1 | 51 of 85 | 60% | 51 of 85 | 0 of 0 | --- | 0 | 0 | 0:05 |
Significant Strikes
| Fighter | Sig. Str. | Sig. Str. % | Head | Body | Leg | Distance | Clinch | Ground |
|---|---|---|---|---|---|---|---|---|
| Andrei Arlovski | 15 of 38 | 39% | 9 of 31 | 4 of 5 | 2 of 2 | 13 of 35 | 1 of 1 | 1 of 2 |
| Travis Browne | 51 of 85 | 60% | 42 of 73 | 7 of 10 | 2 of 2 | 20 of 43 | 28 of 39 | 3 of 3 |
Significant Strikes Per Round
| Rd | Fighter | Sig. Str. | Sig. Str. % | Head | Body | Leg | Distance | Clinch | Ground |
|---|---|---|---|---|---|---|---|---|---|
| 1 | Andrei Arlovski | 15 of 38 | 39% | 9 of 31 | 4 of 5 | 2 of 2 | 13 of 35 | 1 of 1 | 1 of 2 |
| Travis Browne | 51 of 85 | 60% | 42 of 73 | 7 of 10 | 2 of 2 | 20 of 43 | 28 of 39 | 3 of 3 |
WIN
vs
Brendan Schaub
TKO (punches)
R1
4:50
·
UFC 181: Hendricks vs. Lawler II ·
Dec 06, 2014
Totals
| Fighter | KD | Sig. Str. | Sig. Str. % | Total Str. | TD | TD % | Sub. Att | Rev. | Ctrl |
|---|---|---|---|---|---|---|---|---|---|
| Travis Browne | 0 | 25 of 37 | 67% | 36 of 51 | 1 of 1 | 100% | 0 | 0 | 1:41 |
| Brendan Schaub | 0 | 5 of 13 | 38% | 6 of 14 | 1 of 3 | 33% | 0 | 0 | 0:49 |
Per Round
| Rd | Fighter | KD | Sig. Str. | Sig. Str. % | Total Str. | TD | TD % | Sub. Att | Rev. | Ctrl |
|---|---|---|---|---|---|---|---|---|---|---|
| 1 | Travis Browne | 0 | 25 of 37 | 67% | 36 of 51 | 1 of 1 | 100% | 0 | 0 | 1:41 |
| Brendan Schaub | 0 | 5 of 13 | 38% | 6 of 14 | 1 of 3 | 33% | 0 | 0 | 0:49 |
Significant Strikes
| Fighter | Sig. Str. | Sig. Str. % | Head | Body | Leg | Distance | Clinch | Ground |
|---|---|---|---|---|---|---|---|---|
| Travis Browne | 25 of 37 | 67% | 24 of 36 | 1 of 1 | 0 of 0 | 2 of 6 | 1 of 1 | 22 of 30 |
| Brendan Schaub | 5 of 13 | 38% | 3 of 6 | 1 of 3 | 1 of 4 | 4 of 12 | 1 of 1 | 0 of 0 |
Significant Strikes Per Round
| Rd | Fighter | Sig. Str. | Sig. Str. % | Head | Body | Leg | Distance | Clinch | Ground |
|---|---|---|---|---|---|---|---|---|---|
| 1 | Travis Browne | 25 of 37 | 67% | 24 of 36 | 1 of 1 | 0 of 0 | 2 of 6 | 1 of 1 | 22 of 30 |
| Brendan Schaub | 5 of 13 | 38% | 3 of 6 | 1 of 3 | 1 of 4 | 4 of 12 | 1 of 1 | 0 of 0 |
LOSS
vs
Fabrício Werdum
Decision (unanimous) (49–46, 50–45, 50–45)
R5
5:00
·
UFC on Fox: Werdum vs. Browne ·
Apr 19, 2014
Totals
| Fighter | KD | Sig. Str. | Sig. Str. % | Total Str. | TD | TD % | Sub. Att | Rev. | Ctrl |
|---|---|---|---|---|---|---|---|---|---|
| Fabrício Werdum | 0 | 121 of 196 | 61% | 171 of 251 | 2 of 6 | 33% | 0 | 0 | 5:03 |
| Travis Browne | 0 | 60 of 156 | 38% | 77 of 173 | 0 of 1 | 0% | 0 | 0 | 0:47 |
Per Round
| Rd | Fighter | KD | Sig. Str. | Sig. Str. % | Total Str. | TD | TD % | Sub. Att | Rev. | Ctrl |
|---|---|---|---|---|---|---|---|---|---|---|
| 1 | Fabrício Werdum | 0 | 21 of 37 | 56% | 45 of 61 | 1 of 1 | 100% | 0 | 0 | 1:27 |
| Travis Browne | 0 | 17 of 30 | 56% | 24 of 37 | 0 of 0 | --- | 0 | 0 | 0:18 | |
| 2 | Fabrício Werdum | 0 | 15 of 21 | 71% | 39 of 49 | 1 of 1 | 100% | 0 | 0 | 3:04 |
| Travis Browne | 0 | 6 of 17 | 35% | 15 of 26 | 0 of 1 | 0% | 0 | 0 | 0:00 | |
| 3 | Fabrício Werdum | 0 | 38 of 54 | 70% | 40 of 56 | 0 of 1 | 0% | 0 | 0 | 0:27 |
| Travis Browne | 0 | 13 of 35 | 37% | 14 of 36 | 0 of 0 | --- | 0 | 0 | 0:29 | |
| 4 | Fabrício Werdum | 0 | 18 of 33 | 54% | 18 of 34 | 0 of 1 | 0% | 0 | 0 | 0:00 |
| Travis Browne | 0 | 7 of 32 | 21% | 7 of 32 | 0 of 0 | --- | 0 | 0 | 0:00 | |
| 5 | Fabrício Werdum | 0 | 29 of 51 | 56% | 29 of 51 | 0 of 2 | 0% | 0 | 0 | 0:05 |
| Travis Browne | 0 | 17 of 42 | 40% | 17 of 42 | 0 of 0 | --- | 0 | 0 | 0:00 |
Significant Strikes
| Fighter | Sig. Str. | Sig. Str. % | Head | Body | Leg | Distance | Clinch | Ground |
|---|---|---|---|---|---|---|---|---|
| Fabrício Werdum | 121 of 196 | 61% | 82 of 154 | 21 of 24 | 18 of 18 | 113 of 186 | 6 of 8 | 2 of 2 |
| Travis Browne | 60 of 156 | 38% | 36 of 124 | 17 of 22 | 7 of 10 | 48 of 143 | 3 of 4 | 9 of 9 |
Significant Strikes Per Round
| Rd | Fighter | Sig. Str. | Sig. Str. % | Head | Body | Leg | Distance | Clinch | Ground |
|---|---|---|---|---|---|---|---|---|---|
| 1 | Fabrício Werdum | 21 of 37 | 56% | 13 of 29 | 3 of 3 | 5 of 5 | 21 of 36 | 0 of 1 | 0 of 0 |
| Travis Browne | 17 of 30 | 56% | 11 of 23 | 5 of 6 | 1 of 1 | 9 of 21 | 2 of 3 | 6 of 6 | |
| 2 | Fabrício Werdum | 15 of 21 | 71% | 5 of 11 | 6 of 6 | 4 of 4 | 11 of 17 | 2 of 2 | 2 of 2 |
| Travis Browne | 6 of 17 | 35% | 3 of 13 | 3 of 4 | 0 of 0 | 6 of 17 | 0 of 0 | 0 of 0 | |
| 3 | Fabrício Werdum | 38 of 54 | 70% | 24 of 39 | 9 of 10 | 5 of 5 | 34 of 50 | 4 of 4 | 0 of 0 |
| Travis Browne | 13 of 35 | 37% | 9 of 31 | 4 of 4 | 0 of 0 | 9 of 31 | 1 of 1 | 3 of 3 | |
| 4 | Fabrício Werdum | 18 of 33 | 54% | 14 of 27 | 1 of 3 | 3 of 3 | 18 of 32 | 0 of 1 | 0 of 0 |
| Travis Browne | 7 of 32 | 21% | 4 of 26 | 0 of 1 | 3 of 5 | 7 of 32 | 0 of 0 | 0 of 0 | |
| 5 | Fabrício Werdum | 29 of 51 | 56% | 26 of 48 | 2 of 2 | 1 of 1 | 29 of 51 | 0 of 0 | 0 of 0 |
| Travis Browne | 17 of 42 | 40% | 9 of 31 | 5 of 7 | 3 of 4 | 17 of 42 | 0 of 0 | 0 of 0 |
Josh Barnett - Fight History
WIN
vs
Andrei Arlovski
Submission (rear-naked choke)
R3
2:53
·
UFC Fight Night: Arlovski vs. Barnett ·
Sep 03, 2016
Totals
| Fighter | KD | Sig. Str. | Sig. Str. % | Total Str. | TD | TD % | Sub. Att | Rev. | Ctrl |
|---|---|---|---|---|---|---|---|---|---|
| Josh Barnett | 0 | 38 of 62 | 61% | 51 of 77 | 1 of 2 | 50% | 0 | 0 | 2:24 |
| Andrei Arlovski | 0 | 53 of 82 | 64% | 112 of 150 | 1 of 2 | 50% | 1 | 1 | 6:34 |
Per Round
| Rd | Fighter | KD | Sig. Str. | Sig. Str. % | Total Str. | TD | TD % | Sub. Att | Rev. | Ctrl |
|---|---|---|---|---|---|---|---|---|---|---|
| 1 | Josh Barnett | 0 | 16 of 28 | 57% | 25 of 37 | 1 of 1 | 100% | 0 | 0 | 1:41 |
| Andrei Arlovski | 0 | 8 of 16 | 50% | 25 of 37 | 0 of 1 | 0% | 0 | 0 | 1:42 | |
| 2 | Josh Barnett | 0 | 7 of 9 | 77% | 11 of 15 | 0 of 1 | 0% | 0 | 0 | 0:23 |
| Andrei Arlovski | 0 | 28 of 39 | 71% | 66 of 81 | 0 of 0 | --- | 0 | 1 | 3:27 | |
| 3 | Josh Barnett | 0 | 15 of 25 | 60% | 15 of 25 | 0 of 0 | --- | 0 | 0 | 0:20 |
| Andrei Arlovski | 0 | 17 of 27 | 62% | 21 of 32 | 1 of 1 | 100% | 1 | 0 | 1:25 |
Significant Strikes
| Fighter | Sig. Str. | Sig. Str. % | Head | Body | Leg | Distance | Clinch | Ground |
|---|---|---|---|---|---|---|---|---|
| Josh Barnett | 38 of 62 | 61% | 22 of 46 | 11 of 11 | 5 of 5 | 19 of 39 | 16 of 20 | 3 of 3 |
| Andrei Arlovski | 53 of 82 | 64% | 40 of 66 | 12 of 15 | 1 of 1 | 13 of 30 | 15 of 21 | 25 of 31 |
Significant Strikes Per Round
| Rd | Fighter | Sig. Str. | Sig. Str. % | Head | Body | Leg | Distance | Clinch | Ground |
|---|---|---|---|---|---|---|---|---|---|
| 1 | Josh Barnett | 16 of 28 | 57% | 10 of 22 | 3 of 3 | 3 of 3 | 8 of 18 | 5 of 7 | 3 of 3 |
| Andrei Arlovski | 8 of 16 | 50% | 4 of 10 | 3 of 5 | 1 of 1 | 4 of 8 | 4 of 8 | 0 of 0 | |
| 2 | Josh Barnett | 7 of 9 | 77% | 3 of 5 | 4 of 4 | 0 of 0 | 2 of 4 | 5 of 5 | 0 of 0 |
| Andrei Arlovski | 28 of 39 | 71% | 22 of 32 | 6 of 7 | 0 of 0 | 4 of 9 | 5 of 7 | 19 of 23 | |
| 3 | Josh Barnett | 15 of 25 | 60% | 9 of 19 | 4 of 4 | 2 of 2 | 9 of 17 | 6 of 8 | 0 of 0 |
| Andrei Arlovski | 17 of 27 | 62% | 14 of 24 | 3 of 3 | 0 of 0 | 5 of 13 | 6 of 6 | 6 of 8 |
LOSS
vs
Ben Rothwell
Submission (guillotine choke)
R2
3:48
·
UFC on Fox: Johnson vs. Bader ·
Jan 30, 2016
Totals
| Fighter | KD | Sig. Str. | Sig. Str. % | Total Str. | TD | TD % | Sub. Att | Rev. | Ctrl |
|---|---|---|---|---|---|---|---|---|---|
| Ben Rothwell | 0 | 35 of 68 | 51% | 35 of 68 | 0 of 1 | 0% | 0 | 0 | 0:28 |
| Josh Barnett | 0 | 35 of 91 | 38% | 38 of 94 | 0 of 0 | --- | 1 | 0 | 0:07 |
Per Round
| Rd | Fighter | KD | Sig. Str. | Sig. Str. % | Total Str. | TD | TD % | Sub. Att | Rev. | Ctrl |
|---|---|---|---|---|---|---|---|---|---|---|
| 1 | Ben Rothwell | 0 | 20 of 39 | 51% | 20 of 39 | 0 of 0 | --- | 0 | 0 | 0:00 |
| Josh Barnett | 0 | 18 of 39 | 46% | 18 of 39 | 0 of 0 | --- | 0 | 0 | 0:03 | |
| 2 | Ben Rothwell | 0 | 15 of 29 | 51% | 15 of 29 | 0 of 1 | 0% | 0 | 0 | 0:28 |
| Josh Barnett | 0 | 17 of 52 | 32% | 20 of 55 | 0 of 0 | --- | 1 | 0 | 0:04 |
Significant Strikes
| Fighter | Sig. Str. | Sig. Str. % | Head | Body | Leg | Distance | Clinch | Ground |
|---|---|---|---|---|---|---|---|---|
| Ben Rothwell | 35 of 68 | 51% | 21 of 52 | 12 of 14 | 2 of 2 | 33 of 63 | 2 of 5 | 0 of 0 |
| Josh Barnett | 35 of 91 | 38% | 24 of 77 | 5 of 8 | 6 of 6 | 35 of 91 | 0 of 0 | 0 of 0 |
Significant Strikes Per Round
| Rd | Fighter | Sig. Str. | Sig. Str. % | Head | Body | Leg | Distance | Clinch | Ground |
|---|---|---|---|---|---|---|---|---|---|
| 1 | Ben Rothwell | 20 of 39 | 51% | 13 of 31 | 6 of 7 | 1 of 1 | 19 of 35 | 1 of 4 | 0 of 0 |
| Josh Barnett | 18 of 39 | 46% | 11 of 31 | 2 of 3 | 5 of 5 | 18 of 39 | 0 of 0 | 0 of 0 | |
| 2 | Ben Rothwell | 15 of 29 | 51% | 8 of 21 | 6 of 7 | 1 of 1 | 14 of 28 | 1 of 1 | 0 of 0 |
| Josh Barnett | 17 of 52 | 32% | 13 of 46 | 3 of 5 | 1 of 1 | 17 of 52 | 0 of 0 | 0 of 0 |
WIN
vs
Roy Nelson
Decision (unanimous) (48–47, 48–47, 50–45)
R5
5:00
·
UFC Fight Night: Barnett vs. Nelson ·
Sep 27, 2015
Totals
| Fighter | KD | Sig. Str. | Sig. Str. % | Total Str. | TD | TD % | Sub. Att | Rev. | Ctrl |
|---|---|---|---|---|---|---|---|---|---|
| Josh Barnett | 0 | 146 of 205 | 71% | 215 of 276 | 0 of 0 | --- | 0 | 0 | 8:22 |
| Roy Nelson | 0 | 60 of 114 | 52% | 92 of 149 | 4 of 10 | 40% | 0 | 0 | 7:51 |
Per Round
| Rd | Fighter | KD | Sig. Str. | Sig. Str. % | Total Str. | TD | TD % | Sub. Att | Rev. | Ctrl |
|---|---|---|---|---|---|---|---|---|---|---|
| 1 | Josh Barnett | 0 | 17 of 26 | 65% | 27 of 36 | 0 of 0 | --- | 0 | 0 | 0:38 |
| Roy Nelson | 0 | 7 of 13 | 53% | 22 of 30 | 2 of 2 | 100% | 0 | 0 | 2:51 | |
| 2 | Josh Barnett | 0 | 44 of 65 | 67% | 65 of 87 | 0 of 0 | --- | 0 | 0 | 2:17 |
| Roy Nelson | 0 | 16 of 35 | 45% | 19 of 38 | 0 of 1 | 0% | 0 | 0 | 0:00 | |
| 3 | Josh Barnett | 0 | 21 of 31 | 67% | 33 of 43 | 0 of 0 | --- | 0 | 0 | 0:37 |
| Roy Nelson | 0 | 15 of 30 | 50% | 22 of 38 | 0 of 4 | 0% | 0 | 0 | 2:25 | |
| 4 | Josh Barnett | 0 | 39 of 50 | 78% | 57 of 68 | 0 of 0 | --- | 0 | 0 | 2:35 |
| Roy Nelson | 0 | 4 of 10 | 40% | 6 of 12 | 1 of 2 | 50% | 0 | 0 | 1:22 | |
| 5 | Josh Barnett | 0 | 25 of 33 | 75% | 33 of 42 | 0 of 0 | --- | 0 | 0 | 2:15 |
| Roy Nelson | 0 | 18 of 26 | 69% | 23 of 31 | 1 of 1 | 100% | 0 | 0 | 1:13 |
Significant Strikes
| Fighter | Sig. Str. | Sig. Str. % | Head | Body | Leg | Distance | Clinch | Ground |
|---|---|---|---|---|---|---|---|---|
| Josh Barnett | 146 of 205 | 71% | 92 of 147 | 52 of 56 | 2 of 2 | 51 of 95 | 95 of 110 | 0 of 0 |
| Roy Nelson | 60 of 114 | 52% | 38 of 85 | 15 of 19 | 7 of 10 | 28 of 62 | 29 of 49 | 3 of 3 |
Significant Strikes Per Round
| Rd | Fighter | Sig. Str. | Sig. Str. % | Head | Body | Leg | Distance | Clinch | Ground |
|---|---|---|---|---|---|---|---|---|---|
| 1 | Josh Barnett | 17 of 26 | 65% | 7 of 16 | 9 of 9 | 1 of 1 | 6 of 13 | 11 of 13 | 0 of 0 |
| Roy Nelson | 7 of 13 | 53% | 6 of 11 | 1 of 2 | 0 of 0 | 4 of 8 | 2 of 4 | 1 of 1 | |
| 2 | Josh Barnett | 44 of 65 | 67% | 31 of 50 | 12 of 14 | 1 of 1 | 17 of 30 | 27 of 35 | 0 of 0 |
| Roy Nelson | 16 of 35 | 45% | 12 of 29 | 4 of 6 | 0 of 0 | 12 of 29 | 4 of 6 | 0 of 0 | |
| 3 | Josh Barnett | 21 of 31 | 67% | 15 of 24 | 6 of 7 | 0 of 0 | 15 of 25 | 6 of 6 | 0 of 0 |
| Roy Nelson | 15 of 30 | 50% | 6 of 17 | 3 of 4 | 6 of 9 | 5 of 13 | 10 of 17 | 0 of 0 | |
| 4 | Josh Barnett | 39 of 50 | 78% | 27 of 38 | 12 of 12 | 0 of 0 | 5 of 12 | 34 of 38 | 0 of 0 |
| Roy Nelson | 4 of 10 | 40% | 3 of 9 | 0 of 0 | 1 of 1 | 1 of 3 | 3 of 7 | 0 of 0 | |
| 5 | Josh Barnett | 25 of 33 | 75% | 12 of 19 | 13 of 14 | 0 of 0 | 8 of 15 | 17 of 18 | 0 of 0 |
| Roy Nelson | 18 of 26 | 69% | 11 of 19 | 7 of 7 | 0 of 0 | 6 of 9 | 10 of 15 | 2 of 2 |
LOSS
vs
Travis Browne
KO (elbows)
R1
1:00
·
UFC 168: Weidman vs. Silva 2 ·
Dec 28, 2013
Totals
| Fighter | KD | Sig. Str. | Sig. Str. % | Total Str. | TD | TD % | Sub. Att | Rev. | Ctrl |
|---|---|---|---|---|---|---|---|---|---|
| Travis Browne | 0 | 5 of 7 | 71% | 6 of 8 | 0 of 1 | 0% | 0 | 0 | 0:10 |
| Josh Barnett | 0 | 12 of 19 | 63% | 12 of 19 | 0 of 0 | --- | 0 | 0 | 0:00 |
Per Round
| Rd | Fighter | KD | Sig. Str. | Sig. Str. % | Total Str. | TD | TD % | Sub. Att | Rev. | Ctrl |
|---|---|---|---|---|---|---|---|---|---|---|
| 1 | Travis Browne | 0 | 5 of 7 | 71% | 6 of 8 | 0 of 1 | 0% | 0 | 0 | 0:10 |
| Josh Barnett | 0 | 12 of 19 | 63% | 12 of 19 | 0 of 0 | --- | 0 | 0 | 0:00 |
Significant Strikes
| Fighter | Sig. Str. | Sig. Str. % | Head | Body | Leg | Distance | Clinch | Ground |
|---|---|---|---|---|---|---|---|---|
| Travis Browne | 5 of 7 | 71% | 2 of 4 | 1 of 1 | 2 of 2 | 4 of 6 | 1 of 1 | 0 of 0 |
| Josh Barnett | 12 of 19 | 63% | 12 of 19 | 0 of 0 | 0 of 0 | 5 of 12 | 1 of 1 | 6 of 6 |
Significant Strikes Per Round
| Rd | Fighter | Sig. Str. | Sig. Str. % | Head | Body | Leg | Distance | Clinch | Ground |
|---|---|---|---|---|---|---|---|---|---|
| 1 | Travis Browne | 5 of 7 | 71% | 2 of 4 | 1 of 1 | 2 of 2 | 4 of 6 | 1 of 1 | 0 of 0 |
| Josh Barnett | 12 of 19 | 63% | 12 of 19 | 0 of 0 | 0 of 0 | 5 of 12 | 1 of 1 | 6 of 6 |
WIN
vs
Frank Mir
TKO (knee)
R1
1:56
·
UFC 164: Henderson vs. Pettis 2 ·
Aug 31, 2013
Totals
| Fighter | KD | Sig. Str. | Sig. Str. % | Total Str. | TD | TD % | Sub. Att | Rev. | Ctrl |
|---|---|---|---|---|---|---|---|---|---|
| Josh Barnett | 0 | 9 of 16 | 56% | 20 of 29 | 0 of 0 | --- | 0 | 0 | 0:00 |
| Frank Mir | 1 | 26 of 38 | 68% | 33 of 46 | 0 of 0 | --- | 0 | 0 | 1:10 |
Per Round
| Rd | Fighter | KD | Sig. Str. | Sig. Str. % | Total Str. | TD | TD % | Sub. Att | Rev. | Ctrl |
|---|---|---|---|---|---|---|---|---|---|---|
| 1 | Josh Barnett | 0 | 9 of 16 | 56% | 20 of 29 | 0 of 0 | --- | 0 | 0 | 0:00 |
| Frank Mir | 1 | 26 of 38 | 68% | 33 of 46 | 0 of 0 | --- | 0 | 0 | 1:10 |
Significant Strikes
| Fighter | Sig. Str. | Sig. Str. % | Head | Body | Leg | Distance | Clinch | Ground |
|---|---|---|---|---|---|---|---|---|
| Josh Barnett | 9 of 16 | 56% | 6 of 13 | 3 of 3 | 0 of 0 | 0 of 1 | 9 of 15 | 0 of 0 |
| Frank Mir | 26 of 38 | 68% | 13 of 24 | 13 of 14 | 0 of 0 | 1 of 4 | 25 of 33 | 0 of 1 |
Significant Strikes Per Round
| Rd | Fighter | Sig. Str. | Sig. Str. % | Head | Body | Leg | Distance | Clinch | Ground |
|---|---|---|---|---|---|---|---|---|---|
| 1 | Josh Barnett | 9 of 16 | 56% | 6 of 13 | 3 of 3 | 0 of 0 | 0 of 1 | 9 of 15 | 0 of 0 |
| Frank Mir | 26 of 38 | 68% | 13 of 24 | 13 of 14 | 0 of 0 | 1 of 4 | 25 of 33 | 0 of 1 |
WIN
vs
Randy Couture
TKO (punches)
R2
4:35
·
UFC 36: Worlds Collide ·
Mar 22, 2002
Totals
| Fighter | KD | Sig. Str. | Sig. Str. % | Total Str. | TD | TD % | Sub. Att | Rev. | Ctrl |
|---|---|---|---|---|---|---|---|---|---|
| Josh Barnett | 0 | 44 of 75 | 58% | 53 of 85 | 0 of 0 | --- | 1 | 0 | 1:55 |
| Randy Couture | 0 | 18 of 21 | 85% | 33 of 37 | 1 of 3 | 33% | 0 | 0 | 7:18 |
Per Round
| Rd | Fighter | KD | Sig. Str. | Sig. Str. % | Total Str. | TD | TD % | Sub. Att | Rev. | Ctrl |
|---|---|---|---|---|---|---|---|---|---|---|
| 1 | Josh Barnett | 0 | 15 of 19 | 78% | 15 of 19 | 0 of 0 | --- | 1 | 0 | 0:16 |
| Randy Couture | 0 | 15 of 16 | 93% | 24 of 25 | 1 of 2 | 50% | 0 | 0 | 4:31 | |
| 2 | Josh Barnett | 0 | 29 of 56 | 51% | 38 of 66 | 0 of 0 | --- | 0 | 0 | 1:39 |
| Randy Couture | 0 | 3 of 5 | 60% | 9 of 12 | 0 of 1 | 0% | 0 | 0 | 2:47 |
Significant Strikes
| Fighter | Sig. Str. | Sig. Str. % | Head | Body | Leg | Distance | Clinch | Ground |
|---|---|---|---|---|---|---|---|---|
| Josh Barnett | 44 of 75 | 58% | 31 of 60 | 12 of 13 | 1 of 2 | 0 of 2 | 13 of 15 | 31 of 58 |
| Randy Couture | 18 of 21 | 85% | 13 of 15 | 4 of 5 | 1 of 1 | 0 of 1 | 8 of 8 | 10 of 12 |
Significant Strikes Per Round
| Rd | Fighter | Sig. Str. | Sig. Str. % | Head | Body | Leg | Distance | Clinch | Ground |
|---|---|---|---|---|---|---|---|---|---|
| 1 | Josh Barnett | 15 of 19 | 78% | 5 of 7 | 9 of 10 | 1 of 2 | 0 of 1 | 12 of 14 | 3 of 4 |
| Randy Couture | 15 of 16 | 93% | 10 of 11 | 4 of 4 | 1 of 1 | 0 of 0 | 8 of 8 | 7 of 8 | |
| 2 | Josh Barnett | 29 of 56 | 51% | 26 of 53 | 3 of 3 | 0 of 0 | 0 of 1 | 1 of 1 | 28 of 54 |
| Randy Couture | 3 of 5 | 60% | 3 of 4 | 0 of 1 | 0 of 0 | 0 of 1 | 0 of 0 | 3 of 4 |
WIN
vs
Bobby Hoffman
TKO (Submission to punches)
R2
4:25
·
UFC 34: High Voltage ·
Nov 02, 2001
Totals
| Fighter | KD | Sig. Str. | Sig. Str. % | Total Str. | TD | TD % | Sub. Att | Rev. | Ctrl |
|---|---|---|---|---|---|---|---|---|---|
| Josh Barnett | 0 | 17 of 20 | 85% | 83 of 88 | 2 of 2 | 100% | 1 | 0 | 5:27 |
| Bobby Hoffman | 0 | 6 of 14 | 42% | 21 of 31 | 1 of 2 | 50% | 1 | 1 | 3:22 |
Per Round
| Rd | Fighter | KD | Sig. Str. | Sig. Str. % | Total Str. | TD | TD % | Sub. Att | Rev. | Ctrl |
|---|---|---|---|---|---|---|---|---|---|---|
| 1 | Josh Barnett | 0 | 5 of 6 | 83% | 21 of 22 | 1 of 1 | 100% | 1 | 0 | 1:18 |
| Bobby Hoffman | 0 | 5 of 13 | 38% | 13 of 22 | 1 of 2 | 50% | 1 | 1 | 3:22 | |
| 2 | Josh Barnett | 0 | 12 of 14 | 85% | 62 of 66 | 1 of 1 | 100% | 0 | 0 | 4:09 |
| Bobby Hoffman | 0 | 1 of 1 | 100% | 8 of 9 | 0 of 0 | --- | 0 | 0 | 0:00 |
Significant Strikes
| Fighter | Sig. Str. | Sig. Str. % | Head | Body | Leg | Distance | Clinch | Ground |
|---|---|---|---|---|---|---|---|---|
| Josh Barnett | 17 of 20 | 85% | 12 of 15 | 3 of 3 | 2 of 2 | 1 of 2 | 4 of 4 | 12 of 14 |
| Bobby Hoffman | 6 of 14 | 42% | 3 of 10 | 1 of 2 | 2 of 2 | 1 of 2 | 2 of 3 | 3 of 9 |
Significant Strikes Per Round
| Rd | Fighter | Sig. Str. | Sig. Str. % | Head | Body | Leg | Distance | Clinch | Ground |
|---|---|---|---|---|---|---|---|---|---|
| 1 | Josh Barnett | 5 of 6 | 83% | 1 of 2 | 2 of 2 | 2 of 2 | 1 of 2 | 3 of 3 | 1 of 1 |
| Bobby Hoffman | 5 of 13 | 38% | 3 of 10 | 1 of 2 | 1 of 1 | 0 of 1 | 2 of 3 | 3 of 9 | |
| 2 | Josh Barnett | 12 of 14 | 85% | 11 of 13 | 1 of 1 | 0 of 0 | 0 of 0 | 1 of 1 | 11 of 13 |
| Bobby Hoffman | 1 of 1 | 100% | 0 of 0 | 0 of 0 | 1 of 1 | 1 of 1 | 0 of 0 | 0 of 0 |
WIN
vs
Semmy Schilt
Submission (armbar)
R1
4:21
·
UFC 32: Showdown in the Meadowlands ·
Jun 29, 2001
Totals
| Fighter | KD | Sig. Str. | Sig. Str. % | Total Str. | TD | TD % | Sub. Att | Rev. | Ctrl |
|---|---|---|---|---|---|---|---|---|---|
| Josh Barnett | 0 | 10 of 17 | 58% | 21 of 28 | 1 of 1 | 100% | 1 | 0 | 3:35 |
| Semmy Schilt | 0 | 1 of 1 | 100% | 4 of 6 | 0 of 0 | --- | 0 | 0 | 0:32 |
Per Round
| Rd | Fighter | KD | Sig. Str. | Sig. Str. % | Total Str. | TD | TD % | Sub. Att | Rev. | Ctrl |
|---|---|---|---|---|---|---|---|---|---|---|
| 1 | Josh Barnett | 0 | 10 of 17 | 58% | 21 of 28 | 1 of 1 | 100% | 1 | 0 | 3:35 |
| Semmy Schilt | 0 | 1 of 1 | 100% | 4 of 6 | 0 of 0 | --- | 0 | 0 | 0:32 |
Significant Strikes
| Fighter | Sig. Str. | Sig. Str. % | Head | Body | Leg | Distance | Clinch | Ground |
|---|---|---|---|---|---|---|---|---|
| Josh Barnett | 10 of 17 | 58% | 10 of 17 | 0 of 0 | 0 of 0 | 0 of 1 | 0 of 0 | 10 of 16 |
| Semmy Schilt | 1 of 1 | 100% | 0 of 0 | 0 of 0 | 1 of 1 | 1 of 1 | 0 of 0 | 0 of 0 |
Significant Strikes Per Round
| Rd | Fighter | Sig. Str. | Sig. Str. % | Head | Body | Leg | Distance | Clinch | Ground |
|---|---|---|---|---|---|---|---|---|---|
| 1 | Josh Barnett | 10 of 17 | 58% | 10 of 17 | 0 of 0 | 0 of 0 | 0 of 1 | 0 of 0 | 10 of 16 |
| Semmy Schilt | 1 of 1 | 100% | 0 of 0 | 0 of 0 | 1 of 1 | 1 of 1 | 0 of 0 | 0 of 0 |
No comments yet. Be the first to share your thoughts!