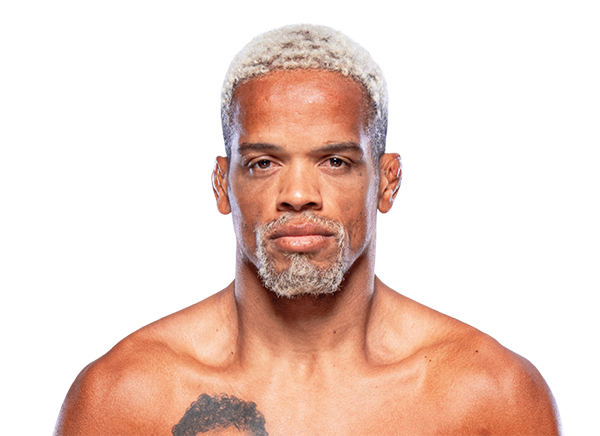
Career Averages - Alan Patrick
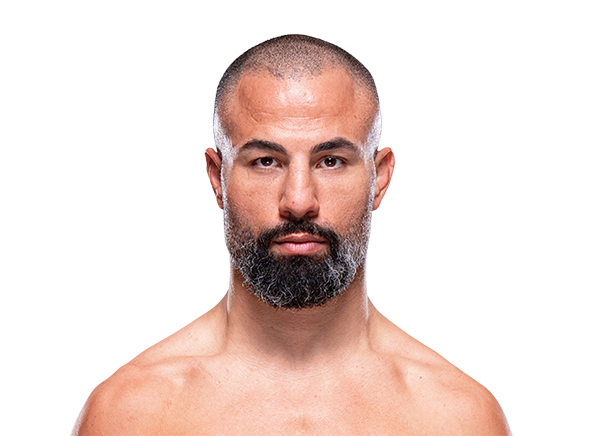
Career Averages - John Makdessi
Alan Patrick - Fight History
Totals
| Fighter | KD | Sig. Str. | Sig. Str. % | Total Str. | TD | TD % | Sub. Att | Rev. | Ctrl |
|---|---|---|---|---|---|---|---|---|---|
| Michael Johnson | 1 | 30 of 48 | 62% | 40 of 61 | 1 of 1 | 100% | 0 | 0 | 2:01 |
| Alan Patrick | 0 | 22 of 47 | 46% | 30 of 56 | 0 of 5 | 0% | 0 | 0 | 0:12 |
Per Round
| Rd | Fighter | KD | Sig. Str. | Sig. Str. % | Total Str. | TD | TD % | Sub. Att | Rev. | Ctrl |
|---|---|---|---|---|---|---|---|---|---|---|
| 1 | Michael Johnson | 0 | 11 of 22 | 50% | 18 of 32 | 1 of 1 | 100% | 0 | 0 | 1:33 |
| Alan Patrick | 0 | 13 of 21 | 61% | 17 of 26 | 0 of 3 | 0% | 0 | 0 | 0:12 | |
| 2 | Michael Johnson | 1 | 19 of 26 | 73% | 22 of 29 | 0 of 0 | --- | 0 | 0 | 0:28 |
| Alan Patrick | 0 | 9 of 26 | 34% | 13 of 30 | 0 of 2 | 0% | 0 | 0 | 0:00 |
Significant Strikes
| Fighter | Sig. Str. | Sig. Str. % | Head | Body | Leg | Distance | Clinch | Ground |
|---|---|---|---|---|---|---|---|---|
| Michael Johnson | 30 of 48 | 62% | 18 of 35 | 9 of 9 | 3 of 4 | 25 of 43 | 2 of 2 | 3 of 3 |
| Alan Patrick | 22 of 47 | 46% | 7 of 30 | 9 of 11 | 6 of 6 | 20 of 42 | 2 of 5 | 0 of 0 |
Significant Strikes Per Round
| Rd | Fighter | Sig. Str. | Sig. Str. % | Head | Body | Leg | Distance | Clinch | Ground |
|---|---|---|---|---|---|---|---|---|---|
| 1 | Michael Johnson | 11 of 22 | 50% | 5 of 15 | 4 of 4 | 2 of 3 | 9 of 20 | 1 of 1 | 1 of 1 |
| Alan Patrick | 13 of 21 | 61% | 4 of 10 | 6 of 8 | 3 of 3 | 11 of 18 | 2 of 3 | 0 of 0 | |
| 2 | Michael Johnson | 19 of 26 | 73% | 13 of 20 | 5 of 5 | 1 of 1 | 16 of 23 | 1 of 1 | 2 of 2 |
| Alan Patrick | 9 of 26 | 34% | 3 of 20 | 3 of 3 | 3 of 3 | 9 of 24 | 0 of 2 | 0 of 0 |
Cody picks Johnson but is hesitant, noting Johnson is a serial 'stunt artist' who finds ways to lose. He acknowledges Johnson's takedown defense is poor and Patrick could take him down. However, he thinks Patrick quit in his last fight and Johnson at least goes out on his shield. He says it's a dogger pass and not a top ticket fight.
Paul leans slightly toward Johnson but is very hesitant. He notes Johnson's pattern of losing fights he should win, but thinks the UFC is giving him a winnable fight against Patrick, who quit in his last outing. He says there are better dogs on the card and it's a pass for him unless weigh-ins change his mind.
Totals
| Fighter | KD | Sig. Str. | Sig. Str. % | Total Str. | TD | TD % | Sub. Att | Rev. | Ctrl |
|---|---|---|---|---|---|---|---|---|---|
| Alan Patrick | 0 | 10 of 32 | 31% | 14 of 39 | 0 of 4 | 0% | 0 | 0 | 0:02 |
| Mason Jones | 0 | 46 of 85 | 54% | 57 of 100 | 2 of 3 | 66% | 0 | 0 | 3:41 |
Per Round
| Rd | Fighter | KD | Sig. Str. | Sig. Str. % | Total Str. | TD | TD % | Sub. Att | Rev. | Ctrl |
|---|---|---|---|---|---|---|---|---|---|---|
| 1 | Alan Patrick | 0 | 7 of 28 | 25% | 7 of 30 | 0 of 3 | 0% | 0 | 0 | 0:00 |
| Mason Jones | 0 | 38 of 71 | 53% | 44 of 78 | 1 of 2 | 50% | 0 | 0 | 2:00 | |
| 2 | Alan Patrick | 0 | 3 of 4 | 75% | 7 of 9 | 0 of 1 | 0% | 0 | 0 | 0:02 |
| Mason Jones | 0 | 8 of 14 | 57% | 13 of 22 | 1 of 1 | 100% | 0 | 0 | 1:41 |
Significant Strikes
| Fighter | Sig. Str. | Sig. Str. % | Head | Body | Leg | Distance | Clinch | Ground |
|---|---|---|---|---|---|---|---|---|
| Alan Patrick | 10 of 32 | 31% | 5 of 25 | 5 of 7 | 0 of 0 | 7 of 29 | 3 of 3 | 0 of 0 |
| Mason Jones | 46 of 85 | 54% | 32 of 67 | 13 of 17 | 1 of 1 | 11 of 37 | 9 of 13 | 26 of 35 |
Significant Strikes Per Round
| Rd | Fighter | Sig. Str. | Sig. Str. % | Head | Body | Leg | Distance | Clinch | Ground |
|---|---|---|---|---|---|---|---|---|---|
| 1 | Alan Patrick | 7 of 28 | 25% | 3 of 22 | 4 of 6 | 0 of 0 | 4 of 25 | 3 of 3 | 0 of 0 |
| Mason Jones | 38 of 71 | 53% | 28 of 58 | 10 of 13 | 0 of 0 | 10 of 32 | 8 of 12 | 20 of 27 | |
| 2 | Alan Patrick | 3 of 4 | 75% | 2 of 3 | 1 of 1 | 0 of 0 | 3 of 4 | 0 of 0 | 0 of 0 |
| Mason Jones | 8 of 14 | 57% | 4 of 9 | 3 of 4 | 1 of 1 | 1 of 5 | 1 of 1 | 6 of 8 |
Big Brady is very confident in Mason Jones, calling him the biggest favorite on the card for a reason. He notes Jones is well-rounded with great striking and a black belt in BJJ, while Patrick is 37, has poor striking defense, and gets wobbled by every shot. He believes Jones will win the striking exchanges by a mile and predicts a knockout, as Patrick's chin is not there.
Cody picks Jones confidently, noting his durability and improvement. He thinks Jones will stop Patrick's takedowns and win on the feet. Cody sees Jones as one of the safer favorites on the card.
Daniel picks Mason Jones to finish the fight, likely by body shot knockout in the second or third round. He notes that Alan Patrick is almost 40, has slowed down, and his athleticism has diminished. Daniel points out that Patrick's takedown defense and get-up game have declined, and he cannot keep up with Jones's pace. He praises Jones's volume, calf kicks, and durability, and believes Jones will overwhelm Patrick and eventually land a fight-ending body shot.
Patrick is one-dimensional and relies on takedowns, but Jones has good takedown defense and get-up ability. Jones has power and will finish Patrick, likely by TKO.
Paul picks Jones confidently, citing his youth, momentum, and well-rounded skills. He notes Patrick's one-dimensional wrestling and inability to get takedowns against better competition. Paul thinks Jones will stuff takedowns and win on the feet. He sees Jones as a safe parlay piece.
The Guru picks Mason Jones, believing Alan Patrick is past his prime and lacks cardio. He thinks Jones is younger, hungrier, and better in all areas, with good jiu-jitsu to neutralize Patrick's grappling. He predicts a third-round TKO via knees against the cage after Patrick fades, though he notes risky moments early where Patrick might get a takedown.
Totals
| Fighter | KD | Sig. Str. | Sig. Str. % | Total Str. | TD | TD % | Sub. Att | Rev. | Ctrl |
|---|---|---|---|---|---|---|---|---|---|
| King Green | 0 | 61 of 95 | 64% | 109 of 149 | 4 of 6 | 66% | 0 | 0 | 7:31 |
| Alan Patrick | 0 | 19 of 69 | 27% | 38 of 89 | 1 of 6 | 16% | 0 | 0 | 1:43 |
Per Round
| Rd | Fighter | KD | Sig. Str. | Sig. Str. % | Total Str. | TD | TD % | Sub. Att | Rev. | Ctrl |
|---|---|---|---|---|---|---|---|---|---|---|
| 1 | King Green | 0 | 16 of 20 | 80% | 35 of 41 | 2 of 3 | 66% | 0 | 0 | 3:52 |
| Alan Patrick | 0 | 2 of 4 | 50% | 8 of 10 | 0 of 3 | 0% | 0 | 0 | 0:50 | |
| 2 | King Green | 0 | 15 of 28 | 53% | 32 of 46 | 1 of 1 | 100% | 0 | 0 | 2:03 |
| Alan Patrick | 0 | 8 of 30 | 26% | 20 of 43 | 0 of 2 | 0% | 0 | 0 | 0:26 | |
| 3 | King Green | 0 | 30 of 47 | 63% | 42 of 62 | 1 of 2 | 50% | 0 | 0 | 1:36 |
| Alan Patrick | 0 | 9 of 35 | 25% | 10 of 36 | 1 of 1 | 100% | 0 | 0 | 0:27 |
Significant Strikes
| Fighter | Sig. Str. | Sig. Str. % | Head | Body | Leg | Distance | Clinch | Ground |
|---|---|---|---|---|---|---|---|---|
| King Green | 61 of 95 | 64% | 41 of 74 | 18 of 19 | 2 of 2 | 35 of 63 | 17 of 18 | 9 of 14 |
| Alan Patrick | 19 of 69 | 27% | 8 of 50 | 7 of 15 | 4 of 4 | 18 of 68 | 0 of 0 | 1 of 1 |
Significant Strikes Per Round
| Rd | Fighter | Sig. Str. | Sig. Str. % | Head | Body | Leg | Distance | Clinch | Ground |
|---|---|---|---|---|---|---|---|---|---|
| 1 | King Green | 16 of 20 | 80% | 6 of 10 | 10 of 10 | 0 of 0 | 2 of 2 | 10 of 10 | 4 of 8 |
| Alan Patrick | 2 of 4 | 50% | 1 of 3 | 1 of 1 | 0 of 0 | 1 of 3 | 0 of 0 | 1 of 1 | |
| 2 | King Green | 15 of 28 | 53% | 13 of 25 | 2 of 3 | 0 of 0 | 9 of 20 | 2 of 3 | 4 of 5 |
| Alan Patrick | 8 of 30 | 26% | 2 of 20 | 2 of 6 | 4 of 4 | 8 of 30 | 0 of 0 | 0 of 0 | |
| 3 | King Green | 30 of 47 | 63% | 22 of 39 | 6 of 6 | 2 of 2 | 24 of 41 | 5 of 5 | 1 of 1 |
| Alan Patrick | 9 of 35 | 25% | 5 of 27 | 4 of 8 | 0 of 0 | 9 of 35 | 0 of 0 | 0 of 0 |
Big Brady picks King Green, believing this is a winnable fight for him. He notes Green has a huge advantage on the feet and decent takedown defense and get-up game. He is fairly confident but acknowledges Green tends to lose close decisions. He predicts Green by decision, as Patrick has never lost by decision.
The host likes Patrick's grinding style and believes he can push Green against the cage and secure takedowns, but is hesitant due to Patrick's two-year layoff. He thinks the line is too wide on Green and would prefer Green at -150, but ultimately picks Patrick by decision while staying away from betting the fight.
The MMA Guru picks Bobby Green (King Green) due to his excellent takedown defense and superior striking. He notes that Alan Patrick has a good ground game but hasn't fought since 2018 and has had multiple cancellations, while Green has been active and looked great against Lando Vannata. He expects Green to stuff takedowns, jab Patrick's face, and win a competitive unanimous decision.
Totals
| Fighter | KD | Sig. Str. | Sig. Str. % | Total Str. | TD | TD % | Sub. Att | Rev. | Ctrl |
|---|---|---|---|---|---|---|---|---|---|
| Scott Holtzman | 1 | 73 of 111 | 65% | 96 of 138 | 1 of 2 | 50% | 0 | 0 | 5:33 |
| Alan Patrick | 0 | 25 of 62 | 40% | 27 of 65 | 0 of 4 | 0% | 0 | 0 | 0:13 |
Per Round
| Rd | Fighter | KD | Sig. Str. | Sig. Str. % | Total Str. | TD | TD % | Sub. Att | Rev. | Ctrl |
|---|---|---|---|---|---|---|---|---|---|---|
| 1 | Scott Holtzman | 0 | 19 of 34 | 55% | 20 of 35 | 0 of 0 | --- | 0 | 0 | 1:13 |
| Alan Patrick | 0 | 11 of 25 | 44% | 12 of 26 | 0 of 1 | 0% | 0 | 0 | 0:00 | |
| 2 | Scott Holtzman | 0 | 23 of 35 | 65% | 34 of 48 | 1 of 2 | 50% | 0 | 0 | 2:13 |
| Alan Patrick | 0 | 11 of 25 | 44% | 12 of 26 | 0 of 3 | 0% | 0 | 0 | 0:13 | |
| 3 | Scott Holtzman | 1 | 31 of 42 | 73% | 42 of 55 | 0 of 0 | --- | 0 | 0 | 2:07 |
| Alan Patrick | 0 | 3 of 12 | 25% | 3 of 13 | 0 of 0 | --- | 0 | 0 | 0:00 |
Significant Strikes
| Fighter | Sig. Str. | Sig. Str. % | Head | Body | Leg | Distance | Clinch | Ground |
|---|---|---|---|---|---|---|---|---|
| Scott Holtzman | 73 of 111 | 65% | 55 of 91 | 8 of 10 | 10 of 10 | 27 of 56 | 6 of 6 | 40 of 49 |
| Alan Patrick | 25 of 62 | 40% | 16 of 45 | 8 of 14 | 1 of 3 | 22 of 58 | 3 of 3 | 0 of 1 |
Significant Strikes Per Round
| Rd | Fighter | Sig. Str. | Sig. Str. % | Head | Body | Leg | Distance | Clinch | Ground |
|---|---|---|---|---|---|---|---|---|---|
| 1 | Scott Holtzman | 19 of 34 | 55% | 10 of 25 | 4 of 4 | 5 of 5 | 13 of 26 | 1 of 1 | 5 of 7 |
| Alan Patrick | 11 of 25 | 44% | 5 of 15 | 5 of 7 | 1 of 3 | 9 of 22 | 2 of 2 | 0 of 1 | |
| 2 | Scott Holtzman | 23 of 35 | 65% | 16 of 26 | 3 of 5 | 4 of 4 | 9 of 18 | 5 of 5 | 9 of 12 |
| Alan Patrick | 11 of 25 | 44% | 8 of 19 | 3 of 6 | 0 of 0 | 10 of 24 | 1 of 1 | 0 of 0 | |
| 3 | Scott Holtzman | 31 of 42 | 73% | 29 of 40 | 1 of 1 | 1 of 1 | 5 of 12 | 0 of 0 | 26 of 30 |
| Alan Patrick | 3 of 12 | 25% | 3 of 11 | 0 of 1 | 0 of 0 | 3 of 12 | 0 of 0 | 0 of 0 |
Totals
| Fighter | KD | Sig. Str. | Sig. Str. % | Total Str. | TD | TD % | Sub. Att | Rev. | Ctrl |
|---|---|---|---|---|---|---|---|---|---|
| Alan Patrick | 0 | 28 of 45 | 62% | 91 of 129 | 9 of 15 | 60% | 0 | 0 | 12:29 |
| Damir Hadžović | 0 | 20 of 25 | 80% | 67 of 81 | 0 of 0 | --- | 1 | 0 | 0:48 |
Per Round
| Rd | Fighter | KD | Sig. Str. | Sig. Str. % | Total Str. | TD | TD % | Sub. Att | Rev. | Ctrl |
|---|---|---|---|---|---|---|---|---|---|---|
| 1 | Alan Patrick | 0 | 17 of 22 | 77% | 45 of 65 | 6 of 9 | 66% | 0 | 0 | 3:33 |
| Damir Hadžović | 0 | 12 of 14 | 85% | 24 of 27 | 0 of 0 | --- | 1 | 0 | 0:48 | |
| 2 | Alan Patrick | 0 | 5 of 12 | 41% | 26 of 39 | 1 of 2 | 50% | 0 | 0 | 4:41 |
| Damir Hadžović | 0 | 1 of 2 | 50% | 27 of 35 | 0 of 0 | --- | 0 | 0 | 0:00 | |
| 3 | Alan Patrick | 0 | 6 of 11 | 54% | 20 of 25 | 2 of 4 | 50% | 0 | 0 | 4:15 |
| Damir Hadžović | 0 | 7 of 9 | 77% | 16 of 19 | 0 of 0 | --- | 0 | 0 | 0:00 |
Significant Strikes
| Fighter | Sig. Str. | Sig. Str. % | Head | Body | Leg | Distance | Clinch | Ground |
|---|---|---|---|---|---|---|---|---|
| Alan Patrick | 28 of 45 | 62% | 20 of 35 | 5 of 7 | 3 of 3 | 8 of 18 | 3 of 4 | 17 of 23 |
| Damir Hadžović | 20 of 25 | 80% | 5 of 8 | 15 of 17 | 0 of 0 | 6 of 9 | 11 of 12 | 3 of 4 |
Significant Strikes Per Round
| Rd | Fighter | Sig. Str. | Sig. Str. % | Head | Body | Leg | Distance | Clinch | Ground |
|---|---|---|---|---|---|---|---|---|---|
| 1 | Alan Patrick | 17 of 22 | 77% | 14 of 18 | 2 of 3 | 1 of 1 | 3 of 4 | 2 of 3 | 12 of 15 |
| Damir Hadžović | 12 of 14 | 85% | 4 of 6 | 8 of 8 | 0 of 0 | 2 of 2 | 7 of 8 | 3 of 4 | |
| 2 | Alan Patrick | 5 of 12 | 41% | 4 of 10 | 0 of 1 | 1 of 1 | 2 of 8 | 0 of 0 | 3 of 4 |
| Damir Hadžović | 1 of 2 | 50% | 0 of 0 | 1 of 2 | 0 of 0 | 1 of 2 | 0 of 0 | 0 of 0 | |
| 3 | Alan Patrick | 6 of 11 | 54% | 2 of 7 | 3 of 3 | 1 of 1 | 3 of 6 | 1 of 1 | 2 of 4 |
| Damir Hadžović | 7 of 9 | 77% | 1 of 2 | 6 of 7 | 0 of 0 | 3 of 5 | 4 of 4 | 0 of 0 |
Totals
| Fighter | KD | Sig. Str. | Sig. Str. % | Total Str. | TD | TD % | Sub. Att | Rev. | Ctrl |
|---|---|---|---|---|---|---|---|---|---|
| Alan Patrick | 0 | 7 of 12 | 58% | 60 of 75 | 5 of 8 | 62% | 1 | 0 | 12:12 |
| Stevie Ray | 0 | 2 of 9 | 22% | 56 of 65 | 0 of 0 | --- | 1 | 0 | 1:32 |
Per Round
| Rd | Fighter | KD | Sig. Str. | Sig. Str. % | Total Str. | TD | TD % | Sub. Att | Rev. | Ctrl |
|---|---|---|---|---|---|---|---|---|---|---|
| 1 | Alan Patrick | 0 | 2 of 4 | 50% | 12 of 16 | 3 of 5 | 60% | 0 | 0 | 4:29 |
| Stevie Ray | 0 | 1 of 1 | 100% | 17 of 17 | 0 of 0 | --- | 1 | 0 | 0:19 | |
| 2 | Alan Patrick | 0 | 3 of 4 | 75% | 18 of 24 | 1 of 2 | 50% | 0 | 0 | 3:22 |
| Stevie Ray | 0 | 0 of 5 | 0% | 27 of 33 | 0 of 0 | --- | 0 | 0 | 0:58 | |
| 3 | Alan Patrick | 0 | 2 of 4 | 50% | 30 of 35 | 1 of 1 | 100% | 1 | 0 | 4:21 |
| Stevie Ray | 0 | 1 of 3 | 33% | 12 of 15 | 0 of 0 | --- | 0 | 0 | 0:15 |
Significant Strikes
| Fighter | Sig. Str. | Sig. Str. % | Head | Body | Leg | Distance | Clinch | Ground |
|---|---|---|---|---|---|---|---|---|
| Alan Patrick | 7 of 12 | 58% | 7 of 11 | 0 of 1 | 0 of 0 | 3 of 6 | 0 of 0 | 4 of 6 |
| Stevie Ray | 2 of 9 | 22% | 2 of 9 | 0 of 0 | 0 of 0 | 0 of 7 | 0 of 0 | 2 of 2 |
Significant Strikes Per Round
| Rd | Fighter | Sig. Str. | Sig. Str. % | Head | Body | Leg | Distance | Clinch | Ground |
|---|---|---|---|---|---|---|---|---|---|
| 1 | Alan Patrick | 2 of 4 | 50% | 2 of 4 | 0 of 0 | 0 of 0 | 0 of 1 | 0 of 0 | 2 of 3 |
| Stevie Ray | 1 of 1 | 100% | 1 of 1 | 0 of 0 | 0 of 0 | 0 of 0 | 0 of 0 | 1 of 1 | |
| 2 | Alan Patrick | 3 of 4 | 75% | 3 of 3 | 0 of 1 | 0 of 0 | 2 of 3 | 0 of 0 | 1 of 1 |
| Stevie Ray | 0 of 5 | 0% | 0 of 5 | 0 of 0 | 0 of 0 | 0 of 5 | 0 of 0 | 0 of 0 | |
| 3 | Alan Patrick | 2 of 4 | 50% | 2 of 4 | 0 of 0 | 0 of 0 | 1 of 2 | 0 of 0 | 1 of 2 |
| Stevie Ray | 1 of 3 | 33% | 1 of 3 | 0 of 0 | 0 of 0 | 0 of 2 | 0 of 0 | 1 of 1 |
Totals
| Fighter | KD | Sig. Str. | Sig. Str. % | Total Str. | TD | TD % | Sub. Att | Rev. | Ctrl |
|---|---|---|---|---|---|---|---|---|---|
| Alan Patrick | 0 | 25 of 39 | 64% | 117 of 147 | 5 of 7 | 71% | 1 | 0 | 12:24 |
| Damien Brown | 0 | 15 of 25 | 60% | 51 of 64 | 1 of 3 | 33% | 1 | 0 | 0:37 |
Per Round
| Rd | Fighter | KD | Sig. Str. | Sig. Str. % | Total Str. | TD | TD % | Sub. Att | Rev. | Ctrl |
|---|---|---|---|---|---|---|---|---|---|---|
| 1 | Alan Patrick | 0 | 8 of 13 | 61% | 37 of 45 | 2 of 2 | 100% | 1 | 0 | 3:26 |
| Damien Brown | 0 | 8 of 12 | 66% | 19 of 24 | 1 of 2 | 50% | 0 | 0 | 0:37 | |
| 2 | Alan Patrick | 0 | 10 of 18 | 55% | 61 of 81 | 1 of 2 | 50% | 0 | 0 | 4:50 |
| Damien Brown | 0 | 3 of 6 | 50% | 28 of 33 | 0 of 0 | --- | 1 | 0 | 0:00 | |
| 3 | Alan Patrick | 0 | 7 of 8 | 87% | 19 of 21 | 2 of 3 | 66% | 0 | 0 | 4:08 |
| Damien Brown | 0 | 4 of 7 | 57% | 4 of 7 | 0 of 1 | 0% | 0 | 0 | 0:00 |
Significant Strikes
| Fighter | Sig. Str. | Sig. Str. % | Head | Body | Leg | Distance | Clinch | Ground |
|---|---|---|---|---|---|---|---|---|
| Alan Patrick | 25 of 39 | 64% | 23 of 36 | 1 of 2 | 1 of 1 | 7 of 12 | 0 of 0 | 18 of 27 |
| Damien Brown | 15 of 25 | 60% | 13 of 21 | 2 of 3 | 0 of 1 | 6 of 11 | 1 of 2 | 8 of 12 |
Significant Strikes Per Round
| Rd | Fighter | Sig. Str. | Sig. Str. % | Head | Body | Leg | Distance | Clinch | Ground |
|---|---|---|---|---|---|---|---|---|---|
| 1 | Alan Patrick | 8 of 13 | 61% | 7 of 11 | 1 of 2 | 0 of 0 | 4 of 7 | 0 of 0 | 4 of 6 |
| Damien Brown | 8 of 12 | 66% | 7 of 11 | 1 of 1 | 0 of 0 | 3 of 5 | 0 of 0 | 5 of 7 | |
| 2 | Alan Patrick | 10 of 18 | 55% | 9 of 17 | 0 of 0 | 1 of 1 | 1 of 2 | 0 of 0 | 9 of 16 |
| Damien Brown | 3 of 6 | 50% | 3 of 5 | 0 of 1 | 0 of 0 | 0 of 0 | 0 of 1 | 3 of 5 | |
| 3 | Alan Patrick | 7 of 8 | 87% | 7 of 8 | 0 of 0 | 0 of 0 | 2 of 3 | 0 of 0 | 5 of 5 |
| Damien Brown | 4 of 7 | 57% | 3 of 5 | 1 of 1 | 0 of 1 | 3 of 6 | 1 of 1 | 0 of 0 |
Totals
| Fighter | KD | Sig. Str. | Sig. Str. % | Total Str. | TD | TD % | Sub. Att | Rev. | Ctrl |
|---|---|---|---|---|---|---|---|---|---|
| Mairbek Taisumov | 1 | 23 of 43 | 53% | 24 of 44 | 0 of 0 | --- | 0 | 0 | 0:15 |
| Alan Patrick | 0 | 17 of 38 | 44% | 17 of 38 | 0 of 7 | 0% | 0 | 0 | 0:23 |
Per Round
| Rd | Fighter | KD | Sig. Str. | Sig. Str. % | Total Str. | TD | TD % | Sub. Att | Rev. | Ctrl |
|---|---|---|---|---|---|---|---|---|---|---|
| 1 | Mairbek Taisumov | 0 | 10 of 21 | 47% | 11 of 22 | 0 of 0 | --- | 0 | 0 | 0:03 |
| Alan Patrick | 0 | 14 of 27 | 51% | 14 of 27 | 0 of 5 | 0% | 0 | 0 | 0:23 | |
| 2 | Mairbek Taisumov | 1 | 13 of 22 | 59% | 13 of 22 | 0 of 0 | --- | 0 | 0 | 0:12 |
| Alan Patrick | 0 | 3 of 11 | 27% | 3 of 11 | 0 of 2 | 0% | 0 | 0 | 0:00 |
Significant Strikes
| Fighter | Sig. Str. | Sig. Str. % | Head | Body | Leg | Distance | Clinch | Ground |
|---|---|---|---|---|---|---|---|---|
| Mairbek Taisumov | 23 of 43 | 53% | 15 of 34 | 7 of 8 | 1 of 1 | 14 of 29 | 1 of 1 | 8 of 13 |
| Alan Patrick | 17 of 38 | 44% | 5 of 24 | 8 of 10 | 4 of 4 | 15 of 35 | 2 of 3 | 0 of 0 |
Significant Strikes Per Round
| Rd | Fighter | Sig. Str. | Sig. Str. % | Head | Body | Leg | Distance | Clinch | Ground |
|---|---|---|---|---|---|---|---|---|---|
| 1 | Mairbek Taisumov | 10 of 21 | 47% | 5 of 15 | 5 of 6 | 0 of 0 | 9 of 20 | 1 of 1 | 0 of 0 |
| Alan Patrick | 14 of 27 | 51% | 4 of 15 | 7 of 9 | 3 of 3 | 13 of 26 | 1 of 1 | 0 of 0 | |
| 2 | Mairbek Taisumov | 13 of 22 | 59% | 10 of 19 | 2 of 2 | 1 of 1 | 5 of 9 | 0 of 0 | 8 of 13 |
| Alan Patrick | 3 of 11 | 27% | 1 of 9 | 1 of 1 | 1 of 1 | 2 of 9 | 1 of 2 | 0 of 0 |
John Makdessi - Fight History
Totals
| Fighter | KD | Sig. Str. | Sig. Str. % | Total Str. | TD | TD % | Sub. Att | Rev. | Ctrl |
|---|---|---|---|---|---|---|---|---|---|
| Jamie Mullarkey | 0 | 88 of 179 | 49% | 88 of 179 | 0 of 2 | 0% | 0 | 0 | 0:00 |
| John Makdessi | 0 | 83 of 188 | 44% | 85 of 190 | 0 of 1 | 0% | 0 | 0 | 0:00 |
Per Round
| Rd | Fighter | KD | Sig. Str. | Sig. Str. % | Total Str. | TD | TD % | Sub. Att | Rev. | Ctrl |
|---|---|---|---|---|---|---|---|---|---|---|
| 1 | Jamie Mullarkey | 0 | 22 of 45 | 48% | 22 of 45 | 0 of 0 | --- | 0 | 0 | 0:00 |
| John Makdessi | 0 | 24 of 51 | 47% | 24 of 51 | 0 of 0 | --- | 0 | 0 | 0:00 | |
| 2 | Jamie Mullarkey | 0 | 37 of 62 | 59% | 37 of 62 | 0 of 1 | 0% | 0 | 0 | 0:00 |
| John Makdessi | 0 | 21 of 61 | 34% | 21 of 61 | 0 of 0 | --- | 0 | 0 | 0:00 | |
| 3 | Jamie Mullarkey | 0 | 29 of 72 | 40% | 29 of 72 | 0 of 1 | 0% | 0 | 0 | 0:00 |
| John Makdessi | 0 | 38 of 76 | 50% | 40 of 78 | 0 of 1 | 0% | 0 | 0 | 0:00 |
Significant Strikes
| Fighter | Sig. Str. | Sig. Str. % | Head | Body | Leg | Distance | Clinch | Ground |
|---|---|---|---|---|---|---|---|---|
| Jamie Mullarkey | 88 of 179 | 49% | 38 of 120 | 13 of 20 | 37 of 39 | 88 of 179 | 0 of 0 | 0 of 0 |
| John Makdessi | 83 of 188 | 44% | 37 of 119 | 22 of 45 | 24 of 24 | 83 of 188 | 0 of 0 | 0 of 0 |
Significant Strikes Per Round
| Rd | Fighter | Sig. Str. | Sig. Str. % | Head | Body | Leg | Distance | Clinch | Ground |
|---|---|---|---|---|---|---|---|---|---|
| 1 | Jamie Mullarkey | 22 of 45 | 48% | 5 of 24 | 4 of 8 | 13 of 13 | 22 of 45 | 0 of 0 | 0 of 0 |
| John Makdessi | 24 of 51 | 47% | 6 of 27 | 10 of 16 | 8 of 8 | 24 of 51 | 0 of 0 | 0 of 0 | |
| 2 | Jamie Mullarkey | 37 of 62 | 59% | 17 of 40 | 8 of 10 | 12 of 12 | 37 of 62 | 0 of 0 | 0 of 0 |
| John Makdessi | 21 of 61 | 34% | 11 of 40 | 5 of 16 | 5 of 5 | 21 of 61 | 0 of 0 | 0 of 0 | |
| 3 | Jamie Mullarkey | 29 of 72 | 40% | 16 of 56 | 1 of 2 | 12 of 14 | 29 of 72 | 0 of 0 | 0 of 0 |
| John Makdessi | 38 of 76 | 50% | 20 of 52 | 7 of 13 | 11 of 11 | 38 of 76 | 0 of 0 | 0 of 0 |
Angelo picks Jamie Mullarkey but hates the -180 price. He notes that Jamie's relentless pressure and takedown attempts should get him a close decision, but he is not dangerous and has poor chin. John Makdessi has good takedown defense and if he keeps it standing, he wins. Angelo avoids betting on Jamie despite picking him.
Big Brady picks the underdog John Makdessi, citing his durability, high volume, and ability to get back up from takedowns. He notes Mullarkey is hittable and has a questionable chin. He thinks Makdessi can outwork Mullarkey over three rounds and predicts a decision win.
Cody picks Mullarkey but is hesitant, noting that Mullarkey has a suspect chin and has been knocked out recently. However, he believes Mullarkey's wrestling and size advantage will be too much for Makdessi, who is a natural featherweight with no knockout power. Cody likes the Mullarkey by decision prop and the over on takedowns.
Daniel Levi picks Jamie Mullarkey but is not crazy about the price. He notes that Makdessi is 38 and has been in many wars, while Mullarkey is younger and has a reach advantage. However, Mullarkey has been knocked out four times, which is a concern. Levi expects Mullarkey to outwork Makdessi down the stretch if he fights with aggression.
Lucrative James leans toward Jamie Mullarkey, citing his youth, tenacity, and a decent win over Prado. He acknowledges Makdessi could win a split decision but notes Makdessi is old and doesn't have knockout power. James expresses slight concern about Mullarkey's chin after a knockout loss, but believes Makdessi is unlikely to finish him. He thinks Mullarkey will dominate.
Mullarkey has improved significantly, blending takedowns behind his striking and managing distance well. He works with the City Kickboxing camp. Makdessi is a veteran who makes fights close but is 38 and may be slowing down. Mullarkey's output and wrestling should earn him a decision win. The over 2.5 rounds is preferred over the moneyline.
Paul picks Mullarkey but is hesitant, citing Mullarkey's durability issues and the -280 price. He notes that Makdessi is a small lightweight with no recent finishes and that Mullarkey should use his wrestling to secure a decision. Paul likes the Mullarkey by decision prop and the over on takedowns.
The MMA Guru picks Jamie Mullarkey over John Makdessi, citing Mullarkey's size advantage (6'0", 74" reach) and physicality. He notes that Mullarkey bullies smaller opponents, as seen in his win over Devonte Smith with body shots and knees. Makdessi is 38 and coming off a loss to Nasrat Haqparast. He believes Mullarkey will bully Makdessi and get a TKO in the first or second round, as Makdessi cannot grapple with him or knock him out.
Totals
| Fighter | KD | Sig. Str. | Sig. Str. % | Total Str. | TD | TD % | Sub. Att | Rev. | Ctrl |
|---|---|---|---|---|---|---|---|---|---|
| Nasrat Haqparast | 0 | 73 of 196 | 37% | 73 of 196 | 0 of 0 | --- | 0 | 0 | 0:00 |
| John Makdessi | 1 | 64 of 173 | 36% | 72 of 181 | 2 of 3 | 66% | 0 | 0 | 0:35 |
Per Round
| Rd | Fighter | KD | Sig. Str. | Sig. Str. % | Total Str. | TD | TD % | Sub. Att | Rev. | Ctrl |
|---|---|---|---|---|---|---|---|---|---|---|
| 1 | Nasrat Haqparast | 0 | 22 of 48 | 45% | 22 of 48 | 0 of 0 | --- | 0 | 0 | 0:00 |
| John Makdessi | 0 | 12 of 43 | 27% | 12 of 43 | 0 of 0 | --- | 0 | 0 | 0:00 | |
| 2 | Nasrat Haqparast | 0 | 23 of 62 | 37% | 23 of 62 | 0 of 0 | --- | 0 | 0 | 0:00 |
| John Makdessi | 1 | 28 of 78 | 35% | 28 of 78 | 0 of 0 | --- | 0 | 0 | 0:06 | |
| 3 | Nasrat Haqparast | 0 | 28 of 86 | 32% | 28 of 86 | 0 of 0 | --- | 0 | 0 | 0:00 |
| John Makdessi | 0 | 24 of 52 | 46% | 32 of 60 | 2 of 3 | 66% | 0 | 0 | 0:29 |
Significant Strikes
| Fighter | Sig. Str. | Sig. Str. % | Head | Body | Leg | Distance | Clinch | Ground |
|---|---|---|---|---|---|---|---|---|
| Nasrat Haqparast | 73 of 196 | 37% | 26 of 122 | 18 of 41 | 29 of 33 | 72 of 195 | 1 of 1 | 0 of 0 |
| John Makdessi | 64 of 173 | 36% | 41 of 139 | 19 of 29 | 4 of 5 | 60 of 168 | 4 of 5 | 0 of 0 |
Significant Strikes Per Round
| Rd | Fighter | Sig. Str. | Sig. Str. % | Head | Body | Leg | Distance | Clinch | Ground |
|---|---|---|---|---|---|---|---|---|---|
| 1 | Nasrat Haqparast | 22 of 48 | 45% | 3 of 21 | 5 of 13 | 14 of 14 | 22 of 48 | 0 of 0 | 0 of 0 |
| John Makdessi | 12 of 43 | 27% | 4 of 35 | 6 of 6 | 2 of 2 | 12 of 43 | 0 of 0 | 0 of 0 | |
| 2 | Nasrat Haqparast | 23 of 62 | 37% | 7 of 36 | 7 of 14 | 9 of 12 | 23 of 62 | 0 of 0 | 0 of 0 |
| John Makdessi | 28 of 78 | 35% | 21 of 64 | 7 of 13 | 0 of 1 | 24 of 73 | 4 of 5 | 0 of 0 | |
| 3 | Nasrat Haqparast | 28 of 86 | 32% | 16 of 65 | 6 of 14 | 6 of 7 | 27 of 85 | 1 of 1 | 0 of 0 |
| John Makdessi | 24 of 52 | 46% | 16 of 40 | 6 of 10 | 2 of 2 | 24 of 52 | 0 of 0 | 0 of 0 |
Angelo picks Nasrat Haqparast because he is younger, faster, and more powerful than John Makdessi, and he believes age and inactivity will keep Makdessi a step behind. He notes Nasrat is a high-volume striker with good takedown defense. He has a moneyline bet on Nasrat and says the line has moved in their favor.
Big Brady picks the underdog John Makdessi, despite concerns about his age (37) and layoff due to leg surgery. He notes that Makdessi has excellent striking defense and volume, and that Haqparast has looked poor lately, losing to Dan Hooker and Bobby Green. He expects a very close fight, possibly a split decision, but sides with the dog.
Cody picks John Makdessi as a confident underdog, arguing that Nasrat Haqparast is overvalued as a -240 favorite. He notes that Haqparast has looked lost since his knockout loss to Drew Dober, with low volume and poor performances against Bobby Green and Dan Hooker. Makdessi, despite being 37 and on a layoff, is healthy and motivated, and his taekwondo footwork and angles should give Haqparast trouble. Cody believes the fight will be close and go to decision, making the plus money attractive. He has already bet Makdessi at +200.
Daniel Levi leans toward Nasrat Haqparast due to his youth and reach advantage, but is not confident. He considers Haqparast a busted prospect and notes that Makdessi is a durable veteran who could win a close decision. He thinks the line is wide and that the fight could be close. He does not bet.
The host leans towards Haqparast, believing he will land the bigger shots and win a decision. However, he is not confident due to Haqparast's inconsistency and Makdessi's veteran savvy. He advises caution and suggests the fight is volatile.
Paul also picks John Makdessi, sharing Cody's view that Haqparast's volume is too low and that Makdessi's experience and striking will keep it competitive. He mentions a personal anecdote about meeting Makdessi years ago, but the reasoning is based on Haqparast's recent struggles and Makdessi's ability to win a close decision. Paul has also bet Makdessi at +200 and calls it his first click of the week.
The MMA Guru hesitantly picks Nasrat Haqparast over John Makdessi, citing Makdessi's age (37) and long layoff (1.5 years). He believes Haqparast is still improving and has a solid chin, while Makdessi may not be the same fighter. He predicts a close 29-28 decision win for Haqparast, with his grit carrying him in the later rounds.
Totals
| Fighter | KD | Sig. Str. | Sig. Str. % | Total Str. | TD | TD % | Sub. Att | Rev. | Ctrl |
|---|---|---|---|---|---|---|---|---|---|
| John Makdessi | 0 | 124 of 232 | 53% | 145 of 257 | 0 of 0 | --- | 0 | 0 | 0:13 |
| Ignacio Bahamondes | 0 | 112 of 312 | 35% | 117 of 318 | 0 of 4 | 0% | 0 | 0 | 1:14 |
Per Round
| Rd | Fighter | KD | Sig. Str. | Sig. Str. % | Total Str. | TD | TD % | Sub. Att | Rev. | Ctrl |
|---|---|---|---|---|---|---|---|---|---|---|
| 1 | John Makdessi | 0 | 36 of 67 | 53% | 52 of 86 | 0 of 0 | --- | 0 | 0 | 0:13 |
| Ignacio Bahamondes | 0 | 37 of 85 | 43% | 40 of 88 | 0 of 2 | 0% | 0 | 0 | 0:36 | |
| 2 | John Makdessi | 0 | 43 of 83 | 51% | 47 of 88 | 0 of 0 | --- | 0 | 0 | 0:00 |
| Ignacio Bahamondes | 0 | 35 of 107 | 32% | 37 of 110 | 0 of 1 | 0% | 0 | 0 | 0:28 | |
| 3 | John Makdessi | 0 | 45 of 82 | 54% | 46 of 83 | 0 of 0 | --- | 0 | 0 | 0:00 |
| Ignacio Bahamondes | 0 | 40 of 120 | 33% | 40 of 120 | 0 of 1 | 0% | 0 | 0 | 0:10 |
Significant Strikes
| Fighter | Sig. Str. | Sig. Str. % | Head | Body | Leg | Distance | Clinch | Ground |
|---|---|---|---|---|---|---|---|---|
| John Makdessi | 124 of 232 | 53% | 72 of 165 | 33 of 45 | 19 of 22 | 109 of 212 | 15 of 20 | 0 of 0 |
| Ignacio Bahamondes | 112 of 312 | 35% | 75 of 268 | 22 of 25 | 15 of 19 | 99 of 297 | 13 of 15 | 0 of 0 |
Significant Strikes Per Round
| Rd | Fighter | Sig. Str. | Sig. Str. % | Head | Body | Leg | Distance | Clinch | Ground |
|---|---|---|---|---|---|---|---|---|---|
| 1 | John Makdessi | 36 of 67 | 53% | 24 of 51 | 7 of 10 | 5 of 6 | 24 of 53 | 12 of 14 | 0 of 0 |
| Ignacio Bahamondes | 37 of 85 | 43% | 22 of 66 | 9 of 10 | 6 of 9 | 31 of 78 | 6 of 7 | 0 of 0 | |
| 2 | John Makdessi | 43 of 83 | 51% | 24 of 56 | 14 of 20 | 5 of 7 | 43 of 83 | 0 of 0 | 0 of 0 |
| Ignacio Bahamondes | 35 of 107 | 32% | 26 of 96 | 4 of 5 | 5 of 6 | 34 of 106 | 1 of 1 | 0 of 0 | |
| 3 | John Makdessi | 45 of 82 | 54% | 24 of 58 | 12 of 15 | 9 of 9 | 42 of 76 | 3 of 6 | 0 of 0 |
| Ignacio Bahamondes | 40 of 120 | 33% | 27 of 106 | 9 of 10 | 4 of 4 | 34 of 113 | 6 of 7 | 0 of 0 |
Big Brady picks Bahamondes to win by decision, citing his significant reach advantage (75.5" vs 68") and youth (23 vs 35). He believes Bahamondes will use his range to pick apart Makdessi, who is coming off an injury layoff. Brady notes Bahamondes has solid volume and technical striking, while Makdessi is low volume and older. He does not love the -190 line but expects Bahamondes to win.
Cody leans Bahamondes, citing his massive reach advantage and youth. He notes Makdessi's lack of takedowns and suspect chin. However, he acknowledges Bahamondes is green and untested. He does not bet it.
Daniel Levi picks Ignacio Bahamondes, citing his youth, height and reach advantage, and training at a high-level gym in Chicago. He notes that John Makdessi has never landed a takedown in his UFC career and has been knocked out multiple times. Levi expects Bahamondes to use his length and volume to out-strike Makdessi, predicting a first-round knockout. He also mentions that Makdessi has a history of skipping wrestling practice.
The host likes Bahamondes' size and reach advantage (7 inches in height and reach), and his fluid striking. He thinks Bahamondes will keep Makdessi on the outside with his jab and kicks, and that Makdessi will struggle to close the distance. He picks Bahamondes to win by decision, though he acknowledges the Contender Series curse could be a factor.
Paul leans Makdessi as a dog, noting his experience, striking volume, and ability to outpoint opponents. He mentions Makdessi's recent ACL surgery and layoff as concerns, but thinks Bahamondes is too green. He calls it a dogger pass.
The MMA Guru initially leans toward Ignacio Bahamondes but ultimately picks John Makdessi. He notes Makdessi is technically sound and out-landed Francisco Trinaldo in some rounds. He criticizes Bahamondes for close fights and being submitted earlier in his career. He thinks Makdessi's experience and grappling will be the difference.
Totals
| Fighter | KD | Sig. Str. | Sig. Str. % | Total Str. | TD | TD % | Sub. Att | Rev. | Ctrl |
|---|---|---|---|---|---|---|---|---|---|
| Francisco Trinaldo | 0 | 55 of 126 | 43% | 55 of 126 | 0 of 1 | 0% | 0 | 0 | 0:00 |
| John Makdessi | 0 | 67 of 123 | 54% | 68 of 124 | 0 of 0 | --- | 0 | 0 | 0:00 |
Per Round
| Rd | Fighter | KD | Sig. Str. | Sig. Str. % | Total Str. | TD | TD % | Sub. Att | Rev. | Ctrl |
|---|---|---|---|---|---|---|---|---|---|---|
| 1 | Francisco Trinaldo | 0 | 12 of 30 | 40% | 12 of 30 | 0 of 0 | --- | 0 | 0 | 0:00 |
| John Makdessi | 0 | 25 of 35 | 71% | 25 of 35 | 0 of 0 | --- | 0 | 0 | 0:00 | |
| 2 | Francisco Trinaldo | 0 | 19 of 44 | 43% | 19 of 44 | 0 of 0 | --- | 0 | 0 | 0:00 |
| John Makdessi | 0 | 19 of 38 | 50% | 19 of 38 | 0 of 0 | --- | 0 | 0 | 0:00 | |
| 3 | Francisco Trinaldo | 0 | 24 of 52 | 46% | 24 of 52 | 0 of 1 | 0% | 0 | 0 | 0:00 |
| John Makdessi | 0 | 23 of 50 | 46% | 24 of 51 | 0 of 0 | --- | 0 | 0 | 0:00 |
Significant Strikes
| Fighter | Sig. Str. | Sig. Str. % | Head | Body | Leg | Distance | Clinch | Ground |
|---|---|---|---|---|---|---|---|---|
| Francisco Trinaldo | 55 of 126 | 43% | 34 of 100 | 17 of 22 | 4 of 4 | 53 of 124 | 2 of 2 | 0 of 0 |
| John Makdessi | 67 of 123 | 54% | 15 of 54 | 16 of 26 | 36 of 43 | 65 of 121 | 2 of 2 | 0 of 0 |
Significant Strikes Per Round
| Rd | Fighter | Sig. Str. | Sig. Str. % | Head | Body | Leg | Distance | Clinch | Ground |
|---|---|---|---|---|---|---|---|---|---|
| 1 | Francisco Trinaldo | 12 of 30 | 40% | 5 of 22 | 6 of 7 | 1 of 1 | 12 of 30 | 0 of 0 | 0 of 0 |
| John Makdessi | 25 of 35 | 71% | 5 of 9 | 7 of 10 | 13 of 16 | 25 of 35 | 0 of 0 | 0 of 0 | |
| 2 | Francisco Trinaldo | 19 of 44 | 43% | 12 of 33 | 6 of 10 | 1 of 1 | 19 of 44 | 0 of 0 | 0 of 0 |
| John Makdessi | 19 of 38 | 50% | 4 of 18 | 5 of 8 | 10 of 12 | 19 of 38 | 0 of 0 | 0 of 0 | |
| 3 | Francisco Trinaldo | 24 of 52 | 46% | 17 of 45 | 5 of 5 | 2 of 2 | 22 of 50 | 2 of 2 | 0 of 0 |
| John Makdessi | 23 of 50 | 46% | 6 of 27 | 4 of 8 | 13 of 15 | 21 of 48 | 2 of 2 | 0 of 0 |
Daniel picks Trinaldo, citing his power and aggression. He thinks Trinaldo's left hand will find Makdessi's chin, which has been broken before. He predicts a decision win for Trinaldo by landing harder shots, even without the crowd.
The host picks John Makdessi over Francisco Trinaldo. He notes that Makdessi has been on a three-fight win streak since a KO loss, while Trinaldo is older and coming off a win over Bobby Green but couldn't beat a one-armed Alexander Hernandez. He expects Makdessi to out-strike Trinaldo for a boring decision win.
Totals
| Fighter | KD | Sig. Str. | Sig. Str. % | Total Str. | TD | TD % | Sub. Att | Rev. | Ctrl |
|---|---|---|---|---|---|---|---|---|---|
| John Makdessi | 0 | 73 of 137 | 53% | 75 of 139 | 0 of 0 | --- | 0 | 0 | 0:02 |
| Jesús Pinedo | 0 | 37 of 113 | 32% | 37 of 114 | 0 of 0 | --- | 0 | 0 | 0:00 |
Per Round
| Rd | Fighter | KD | Sig. Str. | Sig. Str. % | Total Str. | TD | TD % | Sub. Att | Rev. | Ctrl |
|---|---|---|---|---|---|---|---|---|---|---|
| 1 | John Makdessi | 0 | 14 of 28 | 50% | 14 of 28 | 0 of 0 | --- | 0 | 0 | 0:00 |
| Jesús Pinedo | 0 | 7 of 25 | 28% | 7 of 25 | 0 of 0 | --- | 0 | 0 | 0:00 | |
| 2 | John Makdessi | 0 | 28 of 50 | 56% | 30 of 52 | 0 of 0 | --- | 0 | 0 | 0:02 |
| Jesús Pinedo | 0 | 13 of 37 | 35% | 13 of 38 | 0 of 0 | --- | 0 | 0 | 0:00 | |
| 3 | John Makdessi | 0 | 31 of 59 | 52% | 31 of 59 | 0 of 0 | --- | 0 | 0 | 0:00 |
| Jesús Pinedo | 0 | 17 of 51 | 33% | 17 of 51 | 0 of 0 | --- | 0 | 0 | 0:00 |
Significant Strikes
| Fighter | Sig. Str. | Sig. Str. % | Head | Body | Leg | Distance | Clinch | Ground |
|---|---|---|---|---|---|---|---|---|
| John Makdessi | 73 of 137 | 53% | 25 of 60 | 8 of 21 | 40 of 56 | 73 of 137 | 0 of 0 | 0 of 0 |
| Jesús Pinedo | 37 of 113 | 32% | 18 of 74 | 10 of 18 | 9 of 21 | 37 of 113 | 0 of 0 | 0 of 0 |
Significant Strikes Per Round
| Rd | Fighter | Sig. Str. | Sig. Str. % | Head | Body | Leg | Distance | Clinch | Ground |
|---|---|---|---|---|---|---|---|---|---|
| 1 | John Makdessi | 14 of 28 | 50% | 4 of 10 | 2 of 6 | 8 of 12 | 14 of 28 | 0 of 0 | 0 of 0 |
| Jesús Pinedo | 7 of 25 | 28% | 0 of 13 | 2 of 3 | 5 of 9 | 7 of 25 | 0 of 0 | 0 of 0 | |
| 2 | John Makdessi | 28 of 50 | 56% | 8 of 19 | 5 of 8 | 15 of 23 | 28 of 50 | 0 of 0 | 0 of 0 |
| Jesús Pinedo | 13 of 37 | 35% | 7 of 24 | 3 of 6 | 3 of 7 | 13 of 37 | 0 of 0 | 0 of 0 | |
| 3 | John Makdessi | 31 of 59 | 52% | 13 of 31 | 1 of 7 | 17 of 21 | 31 of 59 | 0 of 0 | 0 of 0 |
| Jesús Pinedo | 17 of 51 | 33% | 11 of 37 | 5 of 9 | 1 of 5 | 17 of 51 | 0 of 0 | 0 of 0 |
Totals
| Fighter | KD | Sig. Str. | Sig. Str. % | Total Str. | TD | TD % | Sub. Att | Rev. | Ctrl |
|---|---|---|---|---|---|---|---|---|---|
| John Makdessi | 0 | 131 of 261 | 50% | 134 of 265 | 0 of 0 | --- | 0 | 0 | 0:00 |
| Ross Pearson | 0 | 79 of 224 | 35% | 81 of 226 | 0 of 2 | 0% | 0 | 0 | 0:18 |
Per Round
| Rd | Fighter | KD | Sig. Str. | Sig. Str. % | Total Str. | TD | TD % | Sub. Att | Rev. | Ctrl |
|---|---|---|---|---|---|---|---|---|---|---|
| 1 | John Makdessi | 0 | 30 of 64 | 46% | 30 of 64 | 0 of 0 | --- | 0 | 0 | 0:00 |
| Ross Pearson | 0 | 27 of 65 | 41% | 27 of 65 | 0 of 0 | --- | 0 | 0 | 0:00 | |
| 2 | John Makdessi | 0 | 41 of 83 | 49% | 41 of 83 | 0 of 0 | --- | 0 | 0 | 0:00 |
| Ross Pearson | 0 | 30 of 89 | 33% | 30 of 89 | 0 of 0 | --- | 0 | 0 | 0:00 | |
| 3 | John Makdessi | 0 | 60 of 114 | 52% | 63 of 118 | 0 of 0 | --- | 0 | 0 | 0:00 |
| Ross Pearson | 0 | 22 of 70 | 31% | 24 of 72 | 0 of 2 | 0% | 0 | 0 | 0:18 |
Significant Strikes
| Fighter | Sig. Str. | Sig. Str. % | Head | Body | Leg | Distance | Clinch | Ground |
|---|---|---|---|---|---|---|---|---|
| John Makdessi | 131 of 261 | 50% | 99 of 211 | 13 of 25 | 19 of 25 | 120 of 244 | 11 of 17 | 0 of 0 |
| Ross Pearson | 79 of 224 | 35% | 51 of 182 | 9 of 15 | 19 of 27 | 79 of 223 | 0 of 1 | 0 of 0 |
Significant Strikes Per Round
| Rd | Fighter | Sig. Str. | Sig. Str. % | Head | Body | Leg | Distance | Clinch | Ground |
|---|---|---|---|---|---|---|---|---|---|
| 1 | John Makdessi | 30 of 64 | 46% | 17 of 44 | 1 of 4 | 12 of 16 | 30 of 64 | 0 of 0 | 0 of 0 |
| Ross Pearson | 27 of 65 | 41% | 14 of 48 | 1 of 4 | 12 of 13 | 27 of 65 | 0 of 0 | 0 of 0 | |
| 2 | John Makdessi | 41 of 83 | 49% | 27 of 65 | 10 of 14 | 4 of 4 | 39 of 79 | 2 of 4 | 0 of 0 |
| Ross Pearson | 30 of 89 | 33% | 21 of 74 | 6 of 6 | 3 of 9 | 30 of 89 | 0 of 0 | 0 of 0 | |
| 3 | John Makdessi | 60 of 114 | 52% | 55 of 102 | 2 of 7 | 3 of 5 | 51 of 101 | 9 of 13 | 0 of 0 |
| Ross Pearson | 22 of 70 | 31% | 16 of 60 | 2 of 5 | 4 of 5 | 22 of 69 | 0 of 1 | 0 of 0 |
Totals
| Fighter | KD | Sig. Str. | Sig. Str. % | Total Str. | TD | TD % | Sub. Att | Rev. | Ctrl |
|---|---|---|---|---|---|---|---|---|---|
| John Makdessi | 1 | 47 of 104 | 45% | 57 of 119 | 0 of 0 | --- | 0 | 0 | 0:00 |
| Abel Trujillo | 0 | 29 of 91 | 31% | 30 of 93 | 1 of 6 | 16% | 0 | 0 | 1:37 |
Per Round
| Rd | Fighter | KD | Sig. Str. | Sig. Str. % | Total Str. | TD | TD % | Sub. Att | Rev. | Ctrl |
|---|---|---|---|---|---|---|---|---|---|---|
| 1 | John Makdessi | 1 | 12 of 28 | 42% | 18 of 38 | 0 of 0 | --- | 0 | 0 | 0:00 |
| Abel Trujillo | 0 | 7 of 19 | 36% | 7 of 19 | 0 of 1 | 0% | 0 | 0 | 0:00 | |
| 2 | John Makdessi | 0 | 16 of 41 | 39% | 18 of 43 | 0 of 0 | --- | 0 | 0 | 0:00 |
| Abel Trujillo | 0 | 9 of 36 | 25% | 9 of 36 | 1 of 3 | 33% | 0 | 0 | 1:01 | |
| 3 | John Makdessi | 0 | 19 of 35 | 54% | 21 of 38 | 0 of 0 | --- | 0 | 0 | 0:00 |
| Abel Trujillo | 0 | 13 of 36 | 36% | 14 of 38 | 0 of 2 | 0% | 0 | 0 | 0:36 |
Significant Strikes
| Fighter | Sig. Str. | Sig. Str. % | Head | Body | Leg | Distance | Clinch | Ground |
|---|---|---|---|---|---|---|---|---|
| John Makdessi | 47 of 104 | 45% | 17 of 53 | 13 of 24 | 17 of 27 | 47 of 102 | 0 of 2 | 0 of 0 |
| Abel Trujillo | 29 of 91 | 31% | 23 of 82 | 3 of 6 | 3 of 3 | 28 of 88 | 1 of 3 | 0 of 0 |
Significant Strikes Per Round
| Rd | Fighter | Sig. Str. | Sig. Str. % | Head | Body | Leg | Distance | Clinch | Ground |
|---|---|---|---|---|---|---|---|---|---|
| 1 | John Makdessi | 12 of 28 | 42% | 5 of 15 | 1 of 3 | 6 of 10 | 12 of 28 | 0 of 0 | 0 of 0 |
| Abel Trujillo | 7 of 19 | 36% | 6 of 18 | 1 of 1 | 0 of 0 | 7 of 19 | 0 of 0 | 0 of 0 | |
| 2 | John Makdessi | 16 of 41 | 39% | 4 of 20 | 6 of 11 | 6 of 10 | 16 of 39 | 0 of 2 | 0 of 0 |
| Abel Trujillo | 9 of 36 | 25% | 8 of 33 | 0 of 2 | 1 of 1 | 8 of 33 | 1 of 3 | 0 of 0 | |
| 3 | John Makdessi | 19 of 35 | 54% | 8 of 18 | 6 of 10 | 5 of 7 | 19 of 35 | 0 of 0 | 0 of 0 |
| Abel Trujillo | 13 of 36 | 36% | 9 of 31 | 2 of 3 | 2 of 2 | 13 of 36 | 0 of 0 | 0 of 0 |
Totals
| Fighter | KD | Sig. Str. | Sig. Str. % | Total Str. | TD | TD % | Sub. Att | Rev. | Ctrl |
|---|---|---|---|---|---|---|---|---|---|
| Lando Vannata | 0 | 11 of 13 | 84% | 11 of 13 | 0 of 0 | --- | 0 | 0 | 0:00 |
| John Makdessi | 1 | 10 of 32 | 31% | 10 of 32 | 0 of 0 | --- | 0 | 0 | 0:01 |
Per Round
| Rd | Fighter | KD | Sig. Str. | Sig. Str. % | Total Str. | TD | TD % | Sub. Att | Rev. | Ctrl |
|---|---|---|---|---|---|---|---|---|---|---|
| 1 | Lando Vannata | 0 | 11 of 13 | 84% | 11 of 13 | 0 of 0 | --- | 0 | 0 | 0:00 |
| John Makdessi | 1 | 10 of 32 | 31% | 10 of 32 | 0 of 0 | --- | 0 | 0 | 0:01 |
Significant Strikes
| Fighter | Sig. Str. | Sig. Str. % | Head | Body | Leg | Distance | Clinch | Ground |
|---|---|---|---|---|---|---|---|---|
| Lando Vannata | 11 of 13 | 84% | 2 of 3 | 5 of 6 | 4 of 4 | 11 of 13 | 0 of 0 | 0 of 0 |
| John Makdessi | 10 of 32 | 31% | 3 of 14 | 5 of 11 | 2 of 7 | 10 of 32 | 0 of 0 | 0 of 0 |
Significant Strikes Per Round
| Rd | Fighter | Sig. Str. | Sig. Str. % | Head | Body | Leg | Distance | Clinch | Ground |
|---|---|---|---|---|---|---|---|---|---|
| 1 | Lando Vannata | 11 of 13 | 84% | 2 of 3 | 5 of 6 | 4 of 4 | 11 of 13 | 0 of 0 | 0 of 0 |
| John Makdessi | 10 of 32 | 31% | 3 of 14 | 5 of 11 | 2 of 7 | 10 of 32 | 0 of 0 | 0 of 0 |
No comments yet. Be the first to share your thoughts!