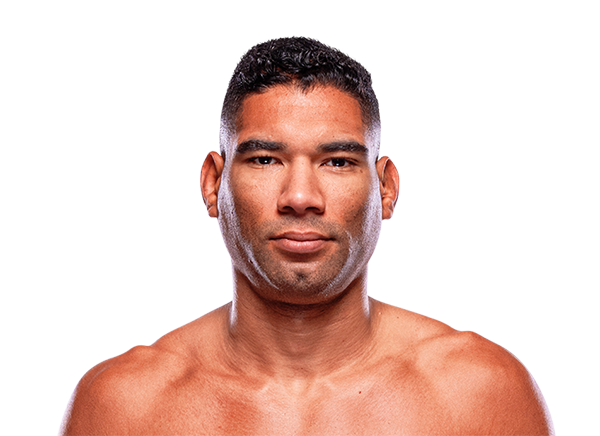
Career Averages - Herbert Burns
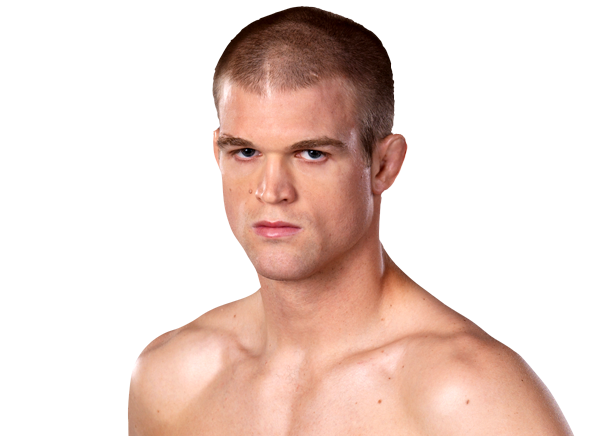
Career Averages - Evan Dunham
Herbert Burns - Fight History
Totals
| Fighter | KD | Sig. Str. | Sig. Str. % | Total Str. | TD | TD % | Sub. Att | Rev. | Ctrl |
|---|---|---|---|---|---|---|---|---|---|
| Jack Jenkins | 2 | 73 of 126 | 57% | 98 of 152 | 0 of 0 | --- | 0 | 0 | 2:44 |
| Herbert Burns | 0 | 24 of 79 | 30% | 45 of 101 | 2 of 9 | 22% | 0 | 0 | 1:54 |
Per Round
| Rd | Fighter | KD | Sig. Str. | Sig. Str. % | Total Str. | TD | TD % | Sub. Att | Rev. | Ctrl |
|---|---|---|---|---|---|---|---|---|---|---|
| 1 | Jack Jenkins | 0 | 39 of 66 | 59% | 53 of 80 | 0 of 0 | --- | 0 | 0 | 0:03 |
| Herbert Burns | 0 | 15 of 53 | 28% | 28 of 66 | 1 of 2 | 50% | 0 | 0 | 1:09 | |
| 2 | Jack Jenkins | 1 | 20 of 38 | 52% | 31 of 50 | 0 of 0 | --- | 0 | 0 | 2:15 |
| Herbert Burns | 0 | 6 of 23 | 26% | 14 of 32 | 1 of 6 | 16% | 0 | 0 | 0:45 | |
| 3 | Jack Jenkins | 1 | 14 of 22 | 63% | 14 of 22 | 0 of 0 | --- | 0 | 0 | 0:26 |
| Herbert Burns | 0 | 3 of 3 | 100% | 3 of 3 | 0 of 1 | 0% | 0 | 0 | 0:00 |
Significant Strikes
| Fighter | Sig. Str. | Sig. Str. % | Head | Body | Leg | Distance | Clinch | Ground |
|---|---|---|---|---|---|---|---|---|
| Jack Jenkins | 73 of 126 | 57% | 44 of 95 | 15 of 15 | 14 of 16 | 59 of 99 | 0 of 1 | 14 of 26 |
| Herbert Burns | 24 of 79 | 30% | 11 of 61 | 7 of 10 | 6 of 8 | 21 of 73 | 3 of 4 | 0 of 2 |
Significant Strikes Per Round
| Rd | Fighter | Sig. Str. | Sig. Str. % | Head | Body | Leg | Distance | Clinch | Ground |
|---|---|---|---|---|---|---|---|---|---|
| 1 | Jack Jenkins | 39 of 66 | 59% | 24 of 51 | 11 of 11 | 4 of 4 | 39 of 65 | 0 of 1 | 0 of 0 |
| Herbert Burns | 15 of 53 | 28% | 8 of 43 | 4 of 6 | 3 of 4 | 14 of 51 | 1 of 2 | 0 of 0 | |
| 2 | Jack Jenkins | 20 of 38 | 52% | 8 of 24 | 3 of 3 | 9 of 11 | 14 of 26 | 0 of 0 | 6 of 12 |
| Herbert Burns | 6 of 23 | 26% | 2 of 17 | 2 of 3 | 2 of 3 | 5 of 20 | 1 of 1 | 0 of 2 | |
| 3 | Jack Jenkins | 14 of 22 | 63% | 12 of 20 | 1 of 1 | 1 of 1 | 6 of 8 | 0 of 0 | 8 of 14 |
| Herbert Burns | 3 of 3 | 100% | 1 of 1 | 1 of 1 | 1 of 1 | 2 of 2 | 1 of 1 | 0 of 0 |
Angelo is confident Jack Jenkins will win, citing his superior striking, takedown defense, and multiple ways to win. He dismisses Herbert Burns as a submission-or-bust fighter with poor offensive wrestling who seems to hate fighting. Angelo expects Jenkins to light Burns up on the feet and suggests parlaying him before the odds get even shorter.
Big Brady picks Jack Jenkins to win by second-round knockout. He notes Herbert Burns is very dangerous in the first five minutes but has poor cardio, heart, and durability, and has been knocked out in the second round in his last three losses. He believes Jenkins can survive the first round, possibly in bad spots, and then finish Burns in the second. He cautions that Jenkins has been finished in all three of his losses, so Burns has a five-minute window to submit him, but overall he expects Jenkins to get the knockout.
Cody is confident Jenkins will win but notes the price is blown out. He expects Jenkins to survive the first round and then take over as Burns gasses. He mentions Jenkins' leg kicks and cardio as advantages, but warns that Burns has a puncher's chance early. Cody suggests live betting Jenkins after the first round.
Daniel Vreeland picks Jack Jenkins to win by late finish, likely in round two or three. He notes that Jenkins is a systematic leg kicker who will chop Burns down, while Burns gasses and has been finished repeatedly. Vreeland suggests playing Jenkins round two as a hedge against the under 1.5 rounds.
The host picks Jenkins, noting his solid striking and mixing of martial arts. He expects Jenkins to avoid Burns' early power and then put a pace on him, finishing him likely by knockout. He mentions the under 1.5 rounds prop as a potential bet, and notes Jenkins' round 2 prop at +550.
Paul acknowledges Jenkins is not a potent finisher but believes he will outlast Burns, who has terrible cardio. He notes that Burns has been submitted in his last two and that Jenkins has never been knocked out. Paul calls it a cop-out but picks Jenkins, though he is priced out of betting.
The MMA Guru picks Jack Jenkins over Herbert Burns. He criticizes Burns as a quitter with only one round of cardio, comparing him to Makwan Amirkhani. He praises Jenkins' takedown defense, noting his strong hips and foot positioning. He predicts Burns will have early moments but gas out and get finished in the second or third round, possibly by TKO. He also mentions body kicks on the ground as a potential finish.
Totals
| Fighter | KD | Sig. Str. | Sig. Str. % | Total Str. | TD | TD % | Sub. Att | Rev. | Ctrl |
|---|---|---|---|---|---|---|---|---|---|
| Julio Arce | 2 | 29 of 79 | 36% | 29 of 79 | 0 of 1 | 0% | 0 | 0 | 0:08 |
| Herbert Burns | 0 | 15 of 57 | 26% | 20 of 63 | 0 of 6 | 0% | 0 | 0 | 1:16 |
Per Round
| Rd | Fighter | KD | Sig. Str. | Sig. Str. % | Total Str. | TD | TD % | Sub. Att | Rev. | Ctrl |
|---|---|---|---|---|---|---|---|---|---|---|
| 1 | Julio Arce | 0 | 10 of 38 | 26% | 10 of 38 | 0 of 1 | 0% | 0 | 0 | 0:06 |
| Herbert Burns | 0 | 11 of 37 | 29% | 16 of 43 | 0 of 5 | 0% | 0 | 0 | 0:50 | |
| 2 | Julio Arce | 2 | 19 of 41 | 46% | 19 of 41 | 0 of 0 | --- | 0 | 0 | 0:02 |
| Herbert Burns | 0 | 4 of 20 | 20% | 4 of 20 | 0 of 1 | 0% | 0 | 0 | 0:26 |
Significant Strikes
| Fighter | Sig. Str. | Sig. Str. % | Head | Body | Leg | Distance | Clinch | Ground |
|---|---|---|---|---|---|---|---|---|
| Julio Arce | 29 of 79 | 36% | 19 of 65 | 9 of 12 | 1 of 2 | 20 of 68 | 9 of 11 | 0 of 0 |
| Herbert Burns | 15 of 57 | 26% | 9 of 45 | 5 of 10 | 1 of 2 | 13 of 55 | 2 of 2 | 0 of 0 |
Significant Strikes Per Round
| Rd | Fighter | Sig. Str. | Sig. Str. % | Head | Body | Leg | Distance | Clinch | Ground |
|---|---|---|---|---|---|---|---|---|---|
| 1 | Julio Arce | 10 of 38 | 26% | 5 of 31 | 5 of 7 | 0 of 0 | 9 of 37 | 1 of 1 | 0 of 0 |
| Herbert Burns | 11 of 37 | 29% | 7 of 29 | 3 of 6 | 1 of 2 | 10 of 36 | 1 of 1 | 0 of 0 | |
| 2 | Julio Arce | 19 of 41 | 46% | 14 of 34 | 4 of 5 | 1 of 2 | 11 of 31 | 8 of 10 | 0 of 0 |
| Herbert Burns | 4 of 20 | 20% | 2 of 16 | 2 of 4 | 0 of 0 | 3 of 19 | 1 of 1 | 0 of 0 |
Angelo is confident Julio Arce will win, citing his solid striking, volume, and 94% takedown defense. He criticizes Herbert Burns for quitting in his last fight and doubts Burns can get takedowns. However, he avoids betting due to Arce's long layoff and steep -550 price.
Cody is wary of Arce's layoff, weight class move, and injuries, but still picks him because Burns is unreliable and quits when his early submission doesn't work. He thinks Arce's volume and durability will carry him, but the -400 price is unappealing.
Daniel Vreeland picks Julio Arce but calls it a dog-or-pass situation at -400. He acknowledges Arce's solid striking and takedown defense but notes Burns' elite jiu-jitsu and motivation. He thinks Burns could get an early submission if Arce makes a mistake, but Arce is the safer pick. He won't lay the price.
Arce is a talented Muay Thai striker with head kicks and combinations. Burns has a terrible gas tank and fades if he doesn't finish early. Arce should stay at distance, land pot shots, and work the body. Burns will present early danger but Arce will take over in the second and third rounds, finishing via TKO. Prediction: Arce round 3.
Paul agrees with Cody's assessment, noting Burns' history of quitting and Arce's potential advantages. He doesn't love the price but sees Arce as the likely winner.
The host picks Julio Arce to survive an early storm from Herbert Burns and then take over. He believes Burns will go for a takedown early, but Arce will work his way out. Once things don't go Burns' way, he expects Burns to break and fade. He predicts a late second-round TKO for Arce.
Totals
| Fighter | KD | Sig. Str. | Sig. Str. % | Total Str. | TD | TD % | Sub. Att | Rev. | Ctrl |
|---|---|---|---|---|---|---|---|---|---|
| Bill Algeo | 0 | 28 of 36 | 77% | 81 of 104 | 1 of 1 | 100% | 0 | 0 | 5:26 |
| Herbert Burns | 0 | 10 of 12 | 83% | 18 of 25 | 1 of 2 | 50% | 2 | 0 | 0:32 |
Per Round
| Rd | Fighter | KD | Sig. Str. | Sig. Str. % | Total Str. | TD | TD % | Sub. Att | Rev. | Ctrl |
|---|---|---|---|---|---|---|---|---|---|---|
| 1 | Bill Algeo | 0 | 24 of 30 | 80% | 65 of 84 | 1 of 1 | 100% | 0 | 0 | 4:01 |
| Herbert Burns | 0 | 10 of 12 | 83% | 18 of 25 | 1 of 1 | 100% | 2 | 0 | 0:32 | |
| 2 | Bill Algeo | 0 | 4 of 6 | 66% | 16 of 20 | 0 of 0 | --- | 0 | 0 | 1:25 |
| Herbert Burns | 0 | 0 of 0 | --- | 0 of 0 | 0 of 1 | 0% | 0 | 0 | 0:00 |
Significant Strikes
| Fighter | Sig. Str. | Sig. Str. % | Head | Body | Leg | Distance | Clinch | Ground |
|---|---|---|---|---|---|---|---|---|
| Bill Algeo | 28 of 36 | 77% | 21 of 28 | 6 of 7 | 1 of 1 | 2 of 4 | 2 of 2 | 24 of 30 |
| Herbert Burns | 10 of 12 | 83% | 6 of 8 | 4 of 4 | 0 of 0 | 1 of 1 | 3 of 3 | 6 of 8 |
Significant Strikes Per Round
| Rd | Fighter | Sig. Str. | Sig. Str. % | Head | Body | Leg | Distance | Clinch | Ground |
|---|---|---|---|---|---|---|---|---|---|
| 1 | Bill Algeo | 24 of 30 | 80% | 19 of 25 | 4 of 4 | 1 of 1 | 1 of 2 | 2 of 2 | 21 of 26 |
| Herbert Burns | 10 of 12 | 83% | 6 of 8 | 4 of 4 | 0 of 0 | 1 of 1 | 3 of 3 | 6 of 8 | |
| 2 | Bill Algeo | 4 of 6 | 66% | 2 of 3 | 2 of 3 | 0 of 0 | 1 of 2 | 0 of 0 | 3 of 4 |
| Herbert Burns | 0 of 0 | --- | 0 of 0 | 0 of 0 | 0 of 0 | 0 of 0 | 0 of 0 | 0 of 0 |
Angelo picks Bill Algeo confidently, citing Algeo's pressure, wrestling defense, and BJJ black belt to neutralize Burns' grappling. He notes Burns' two-year layoff and Algeo's impressive win over Joe Anderson Brito. He has a moneyline bet on Algeo at -160.
Big Brady picks Bill Algeo to win by decision. He notes that Algeo has poor takedown defense but an elite get-up game and a black belt in BJJ, making him hard to hold down. He thinks Burns's cardio will fade after the first round, allowing Algeo to take over on the feet. He mentions a late finish is possible if Burns gasses.
Cody picks Algeo but dislikes the -205 price. He argues that Burns has a terrible gas tank and will fade after the first round, while Algeo has high output and good submission defense. He expects Algeo to survive early takedowns and then overwhelm Burns in later rounds.
Daniel Levi does not make a clear pick, viewing it as a dog-or-pass situation. He notes Algeo's takedown defense issues and Burns's submission threat, but also Burns's cardio and weight cut concerns. He sees Algeo winning the later rounds if he survives, but the -200 price on Algeo is too high for his liking.
Paul also picks Algeo but is not confident, noting that Algeo's takedown defense is poor and Burns is physically strong. He believes Burns will take Algeo down early, but Algeo's BJJ black belt and cardio should allow him to survive and win later rounds. He suggests live betting Algeo after the first round.
The MMA Guru picks Bill Algeo over Herbert Burns, noting Burns' tendency to fade after the second round and Algeo's durability. He mentions Algeo's solid chin and ability to take big shots, as seen in fights against Joe Anderson Brito and Spike Carlyle. He predicts Algeo will survive early rounds and dominate later, winning by decision (29-28 or 29-27).
Totals
| Fighter | KD | Sig. Str. | Sig. Str. % | Total Str. | TD | TD % | Sub. Att | Rev. | Ctrl |
|---|---|---|---|---|---|---|---|---|---|
| Daniel Pineda | 0 | 10 of 22 | 45% | 35 of 48 | 3 of 4 | 75% | 0 | 0 | 2:39 |
| Herbert Burns | 0 | 57 of 75 | 76% | 173 of 205 | 1 of 2 | 50% | 0 | 1 | 6:13 |
Per Round
| Rd | Fighter | KD | Sig. Str. | Sig. Str. % | Total Str. | TD | TD % | Sub. Att | Rev. | Ctrl |
|---|---|---|---|---|---|---|---|---|---|---|
| 1 | Daniel Pineda | 0 | 4 of 13 | 30% | 21 of 31 | 1 of 2 | 50% | 0 | 0 | 0:12 |
| Herbert Burns | 0 | 24 of 40 | 60% | 87 of 111 | 1 of 1 | 100% | 0 | 0 | 4:18 | |
| 2 | Daniel Pineda | 0 | 6 of 9 | 66% | 14 of 17 | 2 of 2 | 100% | 0 | 0 | 2:27 |
| Herbert Burns | 0 | 33 of 35 | 94% | 86 of 94 | 0 of 1 | 0% | 0 | 1 | 1:55 |
Significant Strikes
| Fighter | Sig. Str. | Sig. Str. % | Head | Body | Leg | Distance | Clinch | Ground |
|---|---|---|---|---|---|---|---|---|
| Daniel Pineda | 10 of 22 | 45% | 6 of 15 | 2 of 5 | 2 of 2 | 5 of 15 | 1 of 2 | 4 of 5 |
| Herbert Burns | 57 of 75 | 76% | 50 of 65 | 4 of 7 | 3 of 3 | 8 of 13 | 1 of 1 | 48 of 61 |
Significant Strikes Per Round
| Rd | Fighter | Sig. Str. | Sig. Str. % | Head | Body | Leg | Distance | Clinch | Ground |
|---|---|---|---|---|---|---|---|---|---|
| 1 | Daniel Pineda | 4 of 13 | 30% | 1 of 7 | 2 of 5 | 1 of 1 | 2 of 10 | 1 of 2 | 1 of 1 |
| Herbert Burns | 24 of 40 | 60% | 19 of 32 | 3 of 6 | 2 of 2 | 6 of 10 | 1 of 1 | 17 of 29 | |
| 2 | Daniel Pineda | 6 of 9 | 66% | 5 of 8 | 0 of 0 | 1 of 1 | 3 of 5 | 0 of 0 | 3 of 4 |
| Herbert Burns | 33 of 35 | 94% | 31 of 33 | 1 of 1 | 1 of 1 | 2 of 3 | 0 of 0 | 31 of 32 |
Big Brady is impressed with Herbert Burns' improvements and superior grappling. He expects Burns to submit Pineda in the first round, noting Pineda has been submitted five times. He thinks the fight won't go to decision.
Daniel Levi picks Herbert Burns to win by first-round submission. He notes that Pineda has never been to a decision (0-6 in decisions) and has been submitted six times. He believes Pineda's scrambling style is a bad matchup against Burns' elite jiu-jitsu. He also points out that Pineda's recent wins were overturned due to PEDs, and he may be deflated under USADA testing. He cites Burns' performance against Dunham as evidence of his submission prowess.
Pineda is a live dog with strong wrestling and top pressure; he has not been submitted since 2010 and has the experience to survive Burns' early submission threats. Burns' recent finishes are against over-the-hill competition, while Pineda is still in his prime. The line is too wide; Pineda should be closer to +120. He will play it safe, rack up rounds, and win a decision.
The MMA Guru picks Herbert Burns by submission in the first round, calling it the surest win on the card. He highlights Burns' knockout of Nate Landwehr with a knee up the middle as evidence of his finishing ability, and dismisses Pineda as a past-prime cheater.
Totals
| Fighter | KD | Sig. Str. | Sig. Str. % | Total Str. | TD | TD % | Sub. Att | Rev. | Ctrl |
|---|---|---|---|---|---|---|---|---|---|
| Herbert Burns | 0 | 3 of 6 | 50% | 4 of 7 | 0 of 0 | --- | 0 | 0 | 0:05 |
| Evan Dunham | 0 | 5 of 10 | 50% | 8 of 13 | 1 of 1 | 100% | 1 | 0 | 0:38 |
Per Round
| Rd | Fighter | KD | Sig. Str. | Sig. Str. % | Total Str. | TD | TD % | Sub. Att | Rev. | Ctrl |
|---|---|---|---|---|---|---|---|---|---|---|
| 1 | Herbert Burns | 0 | 3 of 6 | 50% | 4 of 7 | 0 of 0 | --- | 0 | 0 | 0:05 |
| Evan Dunham | 0 | 5 of 10 | 50% | 8 of 13 | 1 of 1 | 100% | 1 | 0 | 0:38 |
Significant Strikes
| Fighter | Sig. Str. | Sig. Str. % | Head | Body | Leg | Distance | Clinch | Ground |
|---|---|---|---|---|---|---|---|---|
| Herbert Burns | 3 of 6 | 50% | 2 of 5 | 1 of 1 | 0 of 0 | 2 of 4 | 1 of 2 | 0 of 0 |
| Evan Dunham | 5 of 10 | 50% | 4 of 6 | 1 of 3 | 0 of 1 | 4 of 8 | 0 of 1 | 1 of 1 |
Significant Strikes Per Round
| Rd | Fighter | Sig. Str. | Sig. Str. % | Head | Body | Leg | Distance | Clinch | Ground |
|---|---|---|---|---|---|---|---|---|---|
| 1 | Herbert Burns | 3 of 6 | 50% | 2 of 5 | 1 of 1 | 0 of 0 | 2 of 4 | 1 of 2 | 0 of 0 |
| Evan Dunham | 5 of 10 | 50% | 4 of 6 | 1 of 3 | 0 of 1 | 4 of 8 | 0 of 1 | 1 of 1 |
Big Brady picks Herbert Burns but is hesitant due to Evan Dunham's layoff and age. He notes Dunham has good striking and BJJ, but the two-year layoff and recent losses make it hard to pick him. He expects a close fight with Burns winning by decision, possibly hurting Dunham to the body.
Daniel believes Burns has caught up to where he can beat a veteran like Dunham. He highlights Burns' wrestling entries, ten-year black belt in jiu-jitsu, and developing power in his striking. He notes Dunham retired for a reason and has shown vulnerability to body shots. He predicts Burns will finish Dunham, possibly by submission or body shots.
Evan Dunham is a high-level jiu-jitsu player with great takedown defense and refined striking. He should be able to keep the fight on the feet and pick apart Herbert Burns, who is wild and chaotic. Dunham's hands have looked good, and he can put together combinations ending with kicks. Even if the fight goes to the ground, Dunham is safe due to his own jiu-jitsu. The only concern is the layoff, but at plus money he is a steal.
Totals
| Fighter | KD | Sig. Str. | Sig. Str. % | Total Str. | TD | TD % | Sub. Att | Rev. | Ctrl |
|---|---|---|---|---|---|---|---|---|---|
| Herbert Burns | 1 | 7 of 17 | 41% | 7 of 17 | 1 of 1 | 100% | 1 | 0 | 1:34 |
| Nate Landwehr | 0 | 4 of 9 | 44% | 6 of 11 | 0 of 0 | --- | 0 | 0 | 0:33 |
Per Round
| Rd | Fighter | KD | Sig. Str. | Sig. Str. % | Total Str. | TD | TD % | Sub. Att | Rev. | Ctrl |
|---|---|---|---|---|---|---|---|---|---|---|
| 1 | Herbert Burns | 1 | 7 of 17 | 41% | 7 of 17 | 1 of 1 | 100% | 1 | 0 | 1:34 |
| Nate Landwehr | 0 | 4 of 9 | 44% | 6 of 11 | 0 of 0 | --- | 0 | 0 | 0:33 |
Significant Strikes
| Fighter | Sig. Str. | Sig. Str. % | Head | Body | Leg | Distance | Clinch | Ground |
|---|---|---|---|---|---|---|---|---|
| Herbert Burns | 7 of 17 | 41% | 2 of 10 | 5 of 7 | 0 of 0 | 4 of 12 | 3 of 3 | 0 of 2 |
| Nate Landwehr | 4 of 9 | 44% | 3 of 8 | 1 of 1 | 0 of 0 | 3 of 8 | 1 of 1 | 0 of 0 |
Significant Strikes Per Round
| Rd | Fighter | Sig. Str. | Sig. Str. % | Head | Body | Leg | Distance | Clinch | Ground |
|---|---|---|---|---|---|---|---|---|---|
| 1 | Herbert Burns | 7 of 17 | 41% | 2 of 10 | 5 of 7 | 0 of 0 | 4 of 12 | 3 of 3 | 0 of 2 |
| Nate Landwehr | 4 of 9 | 44% | 3 of 8 | 1 of 1 | 0 of 0 | 3 of 8 | 1 of 1 | 0 of 0 |
Daniel picks Herbert Burns to win by first-round submission, citing his significant advantage on the mat as a BJJ black belt. He notes that Landwehr has been taken down and dropped multiple times in his fights and may not survive Burns' submission attempts. He believes Burns will take him down and finish quickly.
The MMA Guru picks Herbert Burns based on his denser record of better names and wins, including a notable win over Timothy in ONE FC. He views Burns as a big featherweight to look out for in his debut, while noting Nate Landwehr's record lacks recognizable names.
Evan Dunham - Fight History
Totals
| Fighter | KD | Sig. Str. | Sig. Str. % | Total Str. | TD | TD % | Sub. Att | Rev. | Ctrl |
|---|---|---|---|---|---|---|---|---|---|
| Herbert Burns | 0 | 3 of 6 | 50% | 4 of 7 | 0 of 0 | --- | 0 | 0 | 0:05 |
| Evan Dunham | 0 | 5 of 10 | 50% | 8 of 13 | 1 of 1 | 100% | 1 | 0 | 0:38 |
Per Round
| Rd | Fighter | KD | Sig. Str. | Sig. Str. % | Total Str. | TD | TD % | Sub. Att | Rev. | Ctrl |
|---|---|---|---|---|---|---|---|---|---|---|
| 1 | Herbert Burns | 0 | 3 of 6 | 50% | 4 of 7 | 0 of 0 | --- | 0 | 0 | 0:05 |
| Evan Dunham | 0 | 5 of 10 | 50% | 8 of 13 | 1 of 1 | 100% | 1 | 0 | 0:38 |
Significant Strikes
| Fighter | Sig. Str. | Sig. Str. % | Head | Body | Leg | Distance | Clinch | Ground |
|---|---|---|---|---|---|---|---|---|
| Herbert Burns | 3 of 6 | 50% | 2 of 5 | 1 of 1 | 0 of 0 | 2 of 4 | 1 of 2 | 0 of 0 |
| Evan Dunham | 5 of 10 | 50% | 4 of 6 | 1 of 3 | 0 of 1 | 4 of 8 | 0 of 1 | 1 of 1 |
Significant Strikes Per Round
| Rd | Fighter | Sig. Str. | Sig. Str. % | Head | Body | Leg | Distance | Clinch | Ground |
|---|---|---|---|---|---|---|---|---|---|
| 1 | Herbert Burns | 3 of 6 | 50% | 2 of 5 | 1 of 1 | 0 of 0 | 2 of 4 | 1 of 2 | 0 of 0 |
| Evan Dunham | 5 of 10 | 50% | 4 of 6 | 1 of 3 | 0 of 1 | 4 of 8 | 0 of 1 | 1 of 1 |
Big Brady picks Herbert Burns but is hesitant due to Evan Dunham's layoff and age. He notes Dunham has good striking and BJJ, but the two-year layoff and recent losses make it hard to pick him. He expects a close fight with Burns winning by decision, possibly hurting Dunham to the body.
Daniel believes Burns has caught up to where he can beat a veteran like Dunham. He highlights Burns' wrestling entries, ten-year black belt in jiu-jitsu, and developing power in his striking. He notes Dunham retired for a reason and has shown vulnerability to body shots. He predicts Burns will finish Dunham, possibly by submission or body shots.
Evan Dunham is a high-level jiu-jitsu player with great takedown defense and refined striking. He should be able to keep the fight on the feet and pick apart Herbert Burns, who is wild and chaotic. Dunham's hands have looked good, and he can put together combinations ending with kicks. Even if the fight goes to the ground, Dunham is safe due to his own jiu-jitsu. The only concern is the layoff, but at plus money he is a steal.
Totals
| Fighter | KD | Sig. Str. | Sig. Str. % | Total Str. | TD | TD % | Sub. Att | Rev. | Ctrl |
|---|---|---|---|---|---|---|---|---|---|
| Francisco Trinaldo | 1 | 28 of 69 | 40% | 28 of 69 | 0 of 1 | 0% | 0 | 1 | 0:57 |
| Evan Dunham | 0 | 25 of 85 | 29% | 28 of 88 | 1 of 2 | 50% | 0 | 0 | 0:31 |
Per Round
| Rd | Fighter | KD | Sig. Str. | Sig. Str. % | Total Str. | TD | TD % | Sub. Att | Rev. | Ctrl |
|---|---|---|---|---|---|---|---|---|---|---|
| 1 | Francisco Trinaldo | 0 | 15 of 30 | 50% | 15 of 30 | 0 of 1 | 0% | 0 | 1 | 0:15 |
| Evan Dunham | 0 | 14 of 41 | 34% | 14 of 41 | 1 of 2 | 50% | 0 | 0 | 0:27 | |
| 2 | Francisco Trinaldo | 1 | 13 of 39 | 33% | 13 of 39 | 0 of 0 | --- | 0 | 0 | 0:42 |
| Evan Dunham | 0 | 11 of 44 | 25% | 14 of 47 | 0 of 0 | --- | 0 | 0 | 0:04 |
Significant Strikes
| Fighter | Sig. Str. | Sig. Str. % | Head | Body | Leg | Distance | Clinch | Ground |
|---|---|---|---|---|---|---|---|---|
| Francisco Trinaldo | 28 of 69 | 40% | 20 of 57 | 7 of 11 | 1 of 1 | 22 of 60 | 4 of 7 | 2 of 2 |
| Evan Dunham | 25 of 85 | 29% | 21 of 77 | 3 of 7 | 1 of 1 | 18 of 75 | 6 of 8 | 1 of 2 |
Significant Strikes Per Round
| Rd | Fighter | Sig. Str. | Sig. Str. % | Head | Body | Leg | Distance | Clinch | Ground |
|---|---|---|---|---|---|---|---|---|---|
| 1 | Francisco Trinaldo | 15 of 30 | 50% | 11 of 25 | 3 of 4 | 1 of 1 | 10 of 25 | 3 of 3 | 2 of 2 |
| Evan Dunham | 14 of 41 | 34% | 12 of 38 | 1 of 2 | 1 of 1 | 8 of 33 | 5 of 6 | 1 of 2 | |
| 2 | Francisco Trinaldo | 13 of 39 | 33% | 9 of 32 | 4 of 7 | 0 of 0 | 12 of 35 | 1 of 4 | 0 of 0 |
| Evan Dunham | 11 of 44 | 25% | 9 of 39 | 2 of 5 | 0 of 0 | 10 of 42 | 1 of 2 | 0 of 0 |
Totals
| Fighter | KD | Sig. Str. | Sig. Str. % | Total Str. | TD | TD % | Sub. Att | Rev. | Ctrl |
|---|---|---|---|---|---|---|---|---|---|
| Olivier Aubin-Mercier | 0 | 4 of 14 | 28% | 4 of 14 | 0 of 0 | --- | 0 | 0 | 0:00 |
| Evan Dunham | 1 | 13 of 18 | 72% | 13 of 18 | 0 of 0 | --- | 0 | 0 | 0:07 |
Per Round
| Rd | Fighter | KD | Sig. Str. | Sig. Str. % | Total Str. | TD | TD % | Sub. Att | Rev. | Ctrl |
|---|---|---|---|---|---|---|---|---|---|---|
| 1 | Olivier Aubin-Mercier | 0 | 4 of 14 | 28% | 4 of 14 | 0 of 0 | --- | 0 | 0 | 0:00 |
| Evan Dunham | 1 | 13 of 18 | 72% | 13 of 18 | 0 of 0 | --- | 0 | 0 | 0:07 |
Significant Strikes
| Fighter | Sig. Str. | Sig. Str. % | Head | Body | Leg | Distance | Clinch | Ground |
|---|---|---|---|---|---|---|---|---|
| Olivier Aubin-Mercier | 4 of 14 | 28% | 4 of 14 | 0 of 0 | 0 of 0 | 3 of 13 | 1 of 1 | 0 of 0 |
| Evan Dunham | 13 of 18 | 72% | 9 of 14 | 4 of 4 | 0 of 0 | 3 of 5 | 8 of 9 | 2 of 4 |
Significant Strikes Per Round
| Rd | Fighter | Sig. Str. | Sig. Str. % | Head | Body | Leg | Distance | Clinch | Ground |
|---|---|---|---|---|---|---|---|---|---|
| 1 | Olivier Aubin-Mercier | 4 of 14 | 28% | 4 of 14 | 0 of 0 | 0 of 0 | 3 of 13 | 1 of 1 | 0 of 0 |
| Evan Dunham | 13 of 18 | 72% | 9 of 14 | 4 of 4 | 0 of 0 | 3 of 5 | 8 of 9 | 2 of 4 |
Totals
| Fighter | KD | Sig. Str. | Sig. Str. % | Total Str. | TD | TD % | Sub. Att | Rev. | Ctrl |
|---|---|---|---|---|---|---|---|---|---|
| Beneil Dariush | 1 | 81 of 157 | 51% | 92 of 168 | 0 of 0 | --- | 0 | 0 | 2:56 |
| Evan Dunham | 0 | 36 of 115 | 31% | 66 of 149 | 1 of 7 | 14% | 0 | 0 | 3:14 |
Per Round
| Rd | Fighter | KD | Sig. Str. | Sig. Str. % | Total Str. | TD | TD % | Sub. Att | Rev. | Ctrl |
|---|---|---|---|---|---|---|---|---|---|---|
| 1 | Beneil Dariush | 1 | 36 of 54 | 66% | 44 of 62 | 0 of 0 | --- | 0 | 0 | 2:42 |
| Evan Dunham | 0 | 5 of 23 | 21% | 6 of 24 | 0 of 2 | 0% | 0 | 0 | 0:02 | |
| 2 | Beneil Dariush | 0 | 19 of 35 | 54% | 21 of 37 | 0 of 0 | --- | 0 | 0 | 0:14 |
| Evan Dunham | 0 | 9 of 20 | 45% | 26 of 39 | 1 of 3 | 33% | 0 | 0 | 2:20 | |
| 3 | Beneil Dariush | 0 | 26 of 68 | 38% | 27 of 69 | 0 of 0 | --- | 0 | 0 | 0:00 |
| Evan Dunham | 0 | 22 of 72 | 30% | 34 of 86 | 0 of 2 | 0% | 0 | 0 | 0:52 |
Significant Strikes
| Fighter | Sig. Str. | Sig. Str. % | Head | Body | Leg | Distance | Clinch | Ground |
|---|---|---|---|---|---|---|---|---|
| Beneil Dariush | 81 of 157 | 51% | 60 of 134 | 8 of 9 | 13 of 14 | 48 of 111 | 10 of 15 | 23 of 31 |
| Evan Dunham | 36 of 115 | 31% | 32 of 109 | 4 of 6 | 0 of 0 | 32 of 110 | 4 of 5 | 0 of 0 |
Significant Strikes Per Round
| Rd | Fighter | Sig. Str. | Sig. Str. % | Head | Body | Leg | Distance | Clinch | Ground |
|---|---|---|---|---|---|---|---|---|---|
| 1 | Beneil Dariush | 36 of 54 | 66% | 30 of 48 | 4 of 4 | 2 of 2 | 11 of 20 | 2 of 3 | 23 of 31 |
| Evan Dunham | 5 of 23 | 21% | 5 of 23 | 0 of 0 | 0 of 0 | 5 of 23 | 0 of 0 | 0 of 0 | |
| 2 | Beneil Dariush | 19 of 35 | 54% | 12 of 28 | 2 of 2 | 5 of 5 | 14 of 29 | 5 of 6 | 0 of 0 |
| Evan Dunham | 9 of 20 | 45% | 8 of 19 | 1 of 1 | 0 of 0 | 8 of 19 | 1 of 1 | 0 of 0 | |
| 3 | Beneil Dariush | 26 of 68 | 38% | 18 of 58 | 2 of 3 | 6 of 7 | 23 of 62 | 3 of 6 | 0 of 0 |
| Evan Dunham | 22 of 72 | 30% | 19 of 67 | 3 of 5 | 0 of 0 | 19 of 68 | 3 of 4 | 0 of 0 |
Play-by-Play
View on SherdogRound 1
Dariush takes the center of the cage to start the fight while his fellow southpaw Dunham circles counterclockwise around the perimeter. Both men land glancing left hands in an early exchange, then Dunham tries to latch on to a leg kick but can't wrangle Dariush to the ground. Dariush catches Dunham stepping forward and picks off the Las Vegas resident with a looping left hand. A standing elbow drops Dunham to his knees, and Dariush pounces all over his wounded opponent. Dunham rolls to his back and Dariush postures up over him, blasting the veteran with more elbows, now left hands that have Dunham covering up. Dariush's attack subsides as he settles in Dunham's half guard with two minutes on the clock. With Dunham on one knee, struggling to stand, Dariush drives a nasty knee to his opponent's chest. Dunham grabs for a heel hook from the bottom, but Dariush extracts his leg and stands over him. Dunham gets deep half guard but Dariush roughs him up with more elbows, now some heavy left hands. Dunham gets to his knees, now back to his feet with 25 seconds on the clock, and the round expires without any further offense of note.
Sherdog Scores
Tristen Critchfield scores the round 10-8 Dariush
Brian Knapp scores the round 10-8 Dariush
Chris Nelson scores the round 10-8 Dariush
Round 2
Dariush lands a few early leg kicks, now a knee to the body, but before he can get out of the pocket, Dunham wraps up a bodylock and trips the Kings MMA fighter to the ground. Dariush uses an omoplata from the bottom to slow Dunham's work on top, and now Dunham is forced to stand to withdraw his arm. The lightweights come back to their feet, Dunham now pressing Dariush against the fence. Dariush breaks free with half the round left to fight and goes after Dunham with a pair of punches, another leg kick. The next leg kick catches Dunham leaning forward and nearly knocks him to the floor, but Dunham keeps his balance and continues circling the outside. Now it's Dariush's turn to hug Dunham against the fence, landing a knee to the body on the break after a few seconds in the clinch. Dariush keeps chopping away at Dunham's lead leg, prompting Dunham to run him back against the wall as the round ends.
Sherdog Scores
Tristen Critchfield scores the round 10-9 Dunham
Brian Knapp scores the round 10-9 Dunham
Chris Nelson scores the round 10-9 Dunham
Round 3
Dunham tries to catch a leg kick for an early takedown but can't keep hold of Dariush, though he does hit the Rafael Cordeiro pupil with a right hand on the break. Dariush looks tired, breathing heavily as Dunham begins to tag him with jabs and combinations. Now it's Dunham clinching up again, trapping Dariush on the wall with an underhook and feeding him short right hands. Dariush breaks out midway through the round and gets busier with his striking, marking up Dunham's face with punches before going back to work on his lead leg with kicks. Dunham drives him against the fence again, this time landign a hard knee to the midsection. The striking is getting increasingly sloppy here in the final 90 seconds, with both men swinging for the fences and neither coming up with anything particularly clean. Dunham calls for Dariush to engage, then catches a knee and attacks with punches just before the horn.
Sherdog Scores
Tristen Critchfield scores the round 10-9 Dunham (28-28 Draw)
Brian Knapp scores the round 10-9 Dariush (29-27 Dariush)
Chris Nelson scores the round 10-9 Dunham (28-28 Draw)
The Official Result
Beneil Dariush vs. Evan Dunham is a Majority Draw (29-28, 28-28, 28-28) R3 5:00
Totals
| Fighter | KD | Sig. Str. | Sig. Str. % | Total Str. | TD | TD % | Sub. Att | Rev. | Ctrl |
|---|---|---|---|---|---|---|---|---|---|
| Evan Dunham | 0 | 144 of 279 | 51% | 185 of 330 | 3 of 9 | 33% | 2 | 0 | 7:01 |
| Ricky Glenn | 0 | 58 of 156 | 37% | 63 of 161 | 0 of 3 | 0% | 0 | 0 | 0:00 |
Per Round
| Rd | Fighter | KD | Sig. Str. | Sig. Str. % | Total Str. | TD | TD % | Sub. Att | Rev. | Ctrl |
|---|---|---|---|---|---|---|---|---|---|---|
| 1 | Evan Dunham | 0 | 16 of 29 | 55% | 36 of 56 | 1 of 1 | 100% | 2 | 0 | 4:11 |
| Ricky Glenn | 0 | 6 of 15 | 40% | 8 of 17 | 0 of 0 | --- | 0 | 0 | 0:00 | |
| 2 | Evan Dunham | 0 | 43 of 83 | 51% | 54 of 96 | 2 of 5 | 40% | 0 | 0 | 2:07 |
| Ricky Glenn | 0 | 14 of 54 | 25% | 15 of 55 | 0 of 1 | 0% | 0 | 0 | 0:00 | |
| 3 | Evan Dunham | 0 | 85 of 167 | 50% | 95 of 178 | 0 of 3 | 0% | 0 | 0 | 0:43 |
| Ricky Glenn | 0 | 38 of 87 | 43% | 40 of 89 | 0 of 2 | 0% | 0 | 0 | 0:00 |
Significant Strikes
| Fighter | Sig. Str. | Sig. Str. % | Head | Body | Leg | Distance | Clinch | Ground |
|---|---|---|---|---|---|---|---|---|
| Evan Dunham | 144 of 279 | 51% | 132 of 262 | 12 of 17 | 0 of 0 | 116 of 242 | 14 of 16 | 14 of 21 |
| Ricky Glenn | 58 of 156 | 37% | 43 of 130 | 10 of 21 | 5 of 5 | 48 of 140 | 6 of 9 | 4 of 7 |
Significant Strikes Per Round
| Rd | Fighter | Sig. Str. | Sig. Str. % | Head | Body | Leg | Distance | Clinch | Ground |
|---|---|---|---|---|---|---|---|---|---|
| 1 | Evan Dunham | 16 of 29 | 55% | 13 of 25 | 3 of 4 | 0 of 0 | 6 of 14 | 0 of 0 | 10 of 15 |
| Ricky Glenn | 6 of 15 | 40% | 5 of 11 | 1 of 4 | 0 of 0 | 3 of 10 | 0 of 0 | 3 of 5 | |
| 2 | Evan Dunham | 43 of 83 | 51% | 38 of 77 | 5 of 6 | 0 of 0 | 33 of 70 | 6 of 7 | 4 of 6 |
| Ricky Glenn | 14 of 54 | 25% | 10 of 47 | 2 of 5 | 2 of 2 | 10 of 46 | 3 of 6 | 1 of 2 | |
| 3 | Evan Dunham | 85 of 167 | 50% | 81 of 160 | 4 of 7 | 0 of 0 | 77 of 158 | 8 of 9 | 0 of 0 |
| Ricky Glenn | 38 of 87 | 43% | 28 of 72 | 7 of 12 | 3 of 3 | 35 of 84 | 3 of 3 | 0 of 0 |
Totals
| Fighter | KD | Sig. Str. | Sig. Str. % | Total Str. | TD | TD % | Sub. Att | Rev. | Ctrl |
|---|---|---|---|---|---|---|---|---|---|
| Evan Dunham | 0 | 42 of 113 | 37% | 44 of 115 | 0 of 3 | 0% | 0 | 0 | 0:14 |
| Joe Lauzon | 0 | 127 of 291 | 43% | 147 of 318 | 1 of 3 | 33% | 0 | 0 | 1:50 |
Per Round
| Rd | Fighter | KD | Sig. Str. | Sig. Str. % | Total Str. | TD | TD % | Sub. Att | Rev. | Ctrl |
|---|---|---|---|---|---|---|---|---|---|---|
| 1 | Evan Dunham | 0 | 19 of 55 | 34% | 21 of 57 | 0 of 1 | 0% | 0 | 0 | 0:14 |
| Joe Lauzon | 0 | 39 of 94 | 41% | 40 of 95 | 1 of 1 | 100% | 0 | 0 | 0:09 | |
| 2 | Evan Dunham | 0 | 13 of 27 | 48% | 13 of 27 | 0 of 1 | 0% | 0 | 0 | 0:00 |
| Joe Lauzon | 0 | 36 of 80 | 45% | 54 of 105 | 0 of 2 | 0% | 0 | 0 | 1:37 | |
| 3 | Evan Dunham | 0 | 10 of 31 | 32% | 10 of 31 | 0 of 1 | 0% | 0 | 0 | 0:00 |
| Joe Lauzon | 0 | 52 of 117 | 44% | 53 of 118 | 0 of 0 | --- | 0 | 0 | 0:04 |
Significant Strikes
| Fighter | Sig. Str. | Sig. Str. % | Head | Body | Leg | Distance | Clinch | Ground |
|---|---|---|---|---|---|---|---|---|
| Evan Dunham | 42 of 113 | 37% | 37 of 105 | 3 of 6 | 2 of 2 | 33 of 100 | 9 of 13 | 0 of 0 |
| Joe Lauzon | 127 of 291 | 43% | 96 of 252 | 21 of 29 | 10 of 10 | 97 of 239 | 30 of 52 | 0 of 0 |
Significant Strikes Per Round
| Rd | Fighter | Sig. Str. | Sig. Str. % | Head | Body | Leg | Distance | Clinch | Ground |
|---|---|---|---|---|---|---|---|---|---|
| 1 | Evan Dunham | 19 of 55 | 34% | 17 of 51 | 2 of 4 | 0 of 0 | 14 of 50 | 5 of 5 | 0 of 0 |
| Joe Lauzon | 39 of 94 | 41% | 28 of 80 | 9 of 12 | 2 of 2 | 33 of 84 | 6 of 10 | 0 of 0 | |
| 2 | Evan Dunham | 13 of 27 | 48% | 12 of 25 | 0 of 1 | 1 of 1 | 10 of 20 | 3 of 7 | 0 of 0 |
| Joe Lauzon | 36 of 80 | 45% | 28 of 71 | 4 of 5 | 4 of 4 | 21 of 53 | 15 of 27 | 0 of 0 | |
| 3 | Evan Dunham | 10 of 31 | 32% | 8 of 29 | 1 of 1 | 1 of 1 | 9 of 30 | 1 of 1 | 0 of 0 |
| Joe Lauzon | 52 of 117 | 44% | 40 of 101 | 8 of 12 | 4 of 4 | 43 of 102 | 9 of 15 | 0 of 0 |
Totals
| Fighter | KD | Sig. Str. | Sig. Str. % | Total Str. | TD | TD % | Sub. Att | Rev. | Ctrl |
|---|---|---|---|---|---|---|---|---|---|
| Evan Dunham | 0 | 16 of 28 | 57% | 47 of 67 | 0 of 0 | --- | 0 | 0 | 0:09 |
| Ross Pearson | 0 | 26 of 48 | 54% | 88 of 119 | 5 of 13 | 38% | 1 | 0 | 11:01 |
Per Round
| Rd | Fighter | KD | Sig. Str. | Sig. Str. % | Total Str. | TD | TD % | Sub. Att | Rev. | Ctrl |
|---|---|---|---|---|---|---|---|---|---|---|
| 1 | Evan Dunham | 0 | 3 of 7 | 42% | 13 of 19 | 0 of 0 | --- | 0 | 0 | 0:09 |
| Ross Pearson | 0 | 5 of 13 | 38% | 28 of 39 | 2 of 2 | 100% | 1 | 0 | 3:09 | |
| 2 | Evan Dunham | 0 | 3 of 4 | 75% | 19 of 26 | 0 of 0 | --- | 0 | 0 | 0:00 |
| Ross Pearson | 0 | 14 of 20 | 70% | 44 of 54 | 2 of 4 | 50% | 0 | 0 | 4:38 | |
| 3 | Evan Dunham | 0 | 10 of 17 | 58% | 15 of 22 | 0 of 0 | --- | 0 | 0 | 0:00 |
| Ross Pearson | 0 | 7 of 15 | 46% | 16 of 26 | 1 of 7 | 14% | 0 | 0 | 3:14 |
Significant Strikes
| Fighter | Sig. Str. | Sig. Str. % | Head | Body | Leg | Distance | Clinch | Ground |
|---|---|---|---|---|---|---|---|---|
| Evan Dunham | 16 of 28 | 57% | 10 of 20 | 5 of 7 | 1 of 1 | 6 of 16 | 8 of 10 | 2 of 2 |
| Ross Pearson | 26 of 48 | 54% | 19 of 39 | 1 of 2 | 6 of 7 | 7 of 23 | 9 of 13 | 10 of 12 |
Significant Strikes Per Round
| Rd | Fighter | Sig. Str. | Sig. Str. % | Head | Body | Leg | Distance | Clinch | Ground |
|---|---|---|---|---|---|---|---|---|---|
| 1 | Evan Dunham | 3 of 7 | 42% | 3 of 7 | 0 of 0 | 0 of 0 | 3 of 7 | 0 of 0 | 0 of 0 |
| Ross Pearson | 5 of 13 | 38% | 5 of 12 | 0 of 1 | 0 of 0 | 2 of 10 | 1 of 1 | 2 of 2 | |
| 2 | Evan Dunham | 3 of 4 | 75% | 2 of 3 | 1 of 1 | 0 of 0 | 1 of 2 | 0 of 0 | 2 of 2 |
| Ross Pearson | 14 of 20 | 70% | 8 of 13 | 0 of 0 | 6 of 7 | 0 of 3 | 6 of 7 | 8 of 10 | |
| 3 | Evan Dunham | 10 of 17 | 58% | 5 of 10 | 4 of 6 | 1 of 1 | 2 of 7 | 8 of 10 | 0 of 0 |
| Ross Pearson | 7 of 15 | 46% | 6 of 14 | 1 of 1 | 0 of 0 | 5 of 10 | 2 of 5 | 0 of 0 |
Totals
| Fighter | KD | Sig. Str. | Sig. Str. % | Total Str. | TD | TD % | Sub. Att | Rev. | Ctrl |
|---|---|---|---|---|---|---|---|---|---|
| Evan Dunham | 0 | 152 of 344 | 44% | 156 of 350 | 1 of 2 | 50% | 0 | 0 | 0:34 |
| Rodrigo Damm | 0 | 47 of 153 | 30% | 47 of 153 | 0 of 0 | --- | 0 | 0 | 0:00 |
Per Round
| Rd | Fighter | KD | Sig. Str. | Sig. Str. % | Total Str. | TD | TD % | Sub. Att | Rev. | Ctrl |
|---|---|---|---|---|---|---|---|---|---|---|
| 1 | Evan Dunham | 0 | 53 of 121 | 43% | 53 of 121 | 0 of 0 | --- | 0 | 0 | 0:00 |
| Rodrigo Damm | 0 | 11 of 40 | 27% | 11 of 40 | 0 of 0 | --- | 0 | 0 | 0:00 | |
| 2 | Evan Dunham | 0 | 40 of 92 | 43% | 44 of 98 | 1 of 2 | 50% | 0 | 0 | 0:34 |
| Rodrigo Damm | 0 | 12 of 38 | 31% | 12 of 38 | 0 of 0 | --- | 0 | 0 | 0:00 | |
| 3 | Evan Dunham | 0 | 59 of 131 | 45% | 59 of 131 | 0 of 0 | --- | 0 | 0 | 0:00 |
| Rodrigo Damm | 0 | 24 of 75 | 32% | 24 of 75 | 0 of 0 | --- | 0 | 0 | 0:00 |
Significant Strikes
| Fighter | Sig. Str. | Sig. Str. % | Head | Body | Leg | Distance | Clinch | Ground |
|---|---|---|---|---|---|---|---|---|
| Evan Dunham | 152 of 344 | 44% | 125 of 304 | 22 of 35 | 5 of 5 | 147 of 336 | 5 of 8 | 0 of 0 |
| Rodrigo Damm | 47 of 153 | 30% | 37 of 139 | 8 of 12 | 2 of 2 | 46 of 152 | 1 of 1 | 0 of 0 |
Significant Strikes Per Round
| Rd | Fighter | Sig. Str. | Sig. Str. % | Head | Body | Leg | Distance | Clinch | Ground |
|---|---|---|---|---|---|---|---|---|---|
| 1 | Evan Dunham | 53 of 121 | 43% | 44 of 107 | 6 of 11 | 3 of 3 | 53 of 121 | 0 of 0 | 0 of 0 |
| Rodrigo Damm | 11 of 40 | 27% | 9 of 37 | 2 of 3 | 0 of 0 | 11 of 40 | 0 of 0 | 0 of 0 | |
| 2 | Evan Dunham | 40 of 92 | 43% | 31 of 81 | 7 of 9 | 2 of 2 | 37 of 87 | 3 of 5 | 0 of 0 |
| Rodrigo Damm | 12 of 38 | 31% | 9 of 35 | 3 of 3 | 0 of 0 | 11 of 37 | 1 of 1 | 0 of 0 | |
| 3 | Evan Dunham | 59 of 131 | 45% | 50 of 116 | 9 of 15 | 0 of 0 | 57 of 128 | 2 of 3 | 0 of 0 |
| Rodrigo Damm | 24 of 75 | 32% | 19 of 67 | 3 of 6 | 2 of 2 | 24 of 75 | 0 of 0 | 0 of 0 |
Expert Picks (3)
Big Brady picks Herbert Burns but is hesitant due to Evan Dunham's layoff and age. He notes Dunham has good striking and BJJ, but the two-year layoff and recent losses make it hard to pick him. He expects a close fight with Burns winning by decision, possibly hurting Dunham to the body.
Daniel believes Burns has caught up to where he can beat a veteran like Dunham. He highlights Burns' wrestling entries, ten-year black belt in jiu-jitsu, and developing power in his striking. He notes Dunham retired for a reason and has shown vulnerability to body shots. He predicts Burns will finish Dunham, possibly by submission or body shots.
Evan Dunham is a high-level jiu-jitsu player with great takedown defense and refined striking. He should be able to keep the fight on the feet and pick apart Herbert Burns, who is wild and chaotic. Dunham's hands have looked good, and he can put together combinations ending with kicks. Even if the fight goes to the ground, Dunham is safe due to his own jiu-jitsu. The only concern is the layoff, but at plus money he is a steal.
Poor Burns +600, Jenkins nice leg kicks. Kicks set up the hands. Burns gets the take down end of rd1